

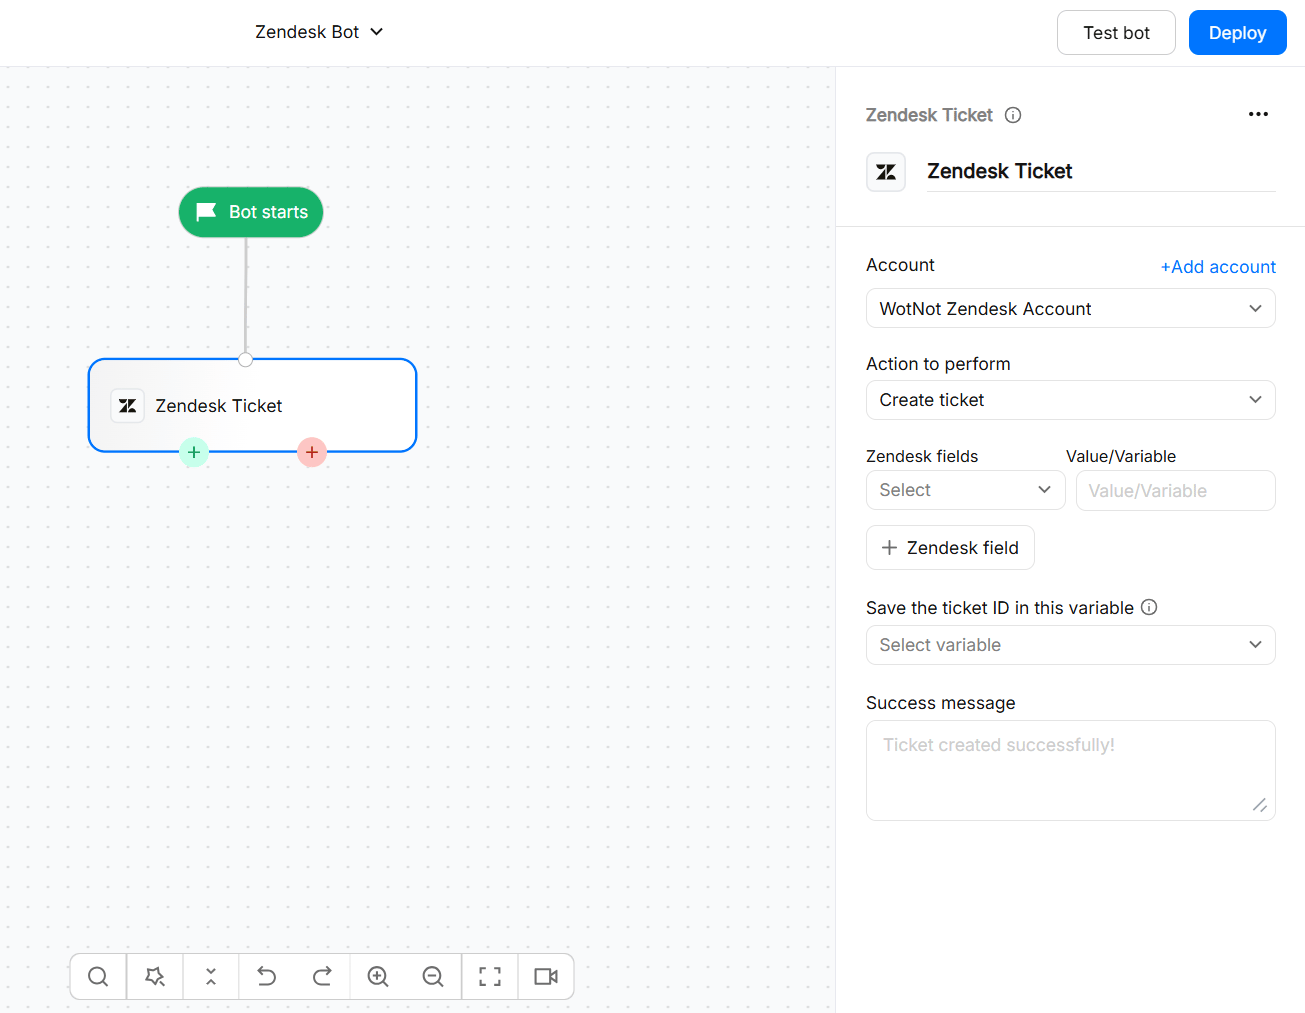
- Create tickets
- Get ticket status
- Live chat in Zendesk
Push and fetch: Zendesk supports both sending information from WotNot to Zendesk and fetching ticket information back into the chatbot.
Available on the STARTER plan and above.
What you can do
Before you start
Make sure you have the following ready before connecting Zendesk:- A Zendesk account with API access.
- Administrator access to your Zendesk account.
- Your Zendesk account email.
- A Zendesk API token.
- Your Zendesk helpdesk URL or subdomain, for example:
https://yourcompany.zendesk.com - Any mandatory Zendesk ticket fields that you want to populate from WotNot.
- A WotNot plan that supports the Zendesk integration.
Connecting Zendesk
- Open your chatbot flow.
- Add the Zendesk action block.
- Click connect Zendesk account.
- Enter an Account name to identify the Zendesk connection.
- Enter your Helpdesk URL.
- Enter the Zendesk account email.
- Enter your API token.
- Save the connection.
WotNot currently uses an API token for the Zendesk connection. The Zendesk account email is an administrator email and is also used when configuring the webhook required for Zendesk live chat.
Using it in a flow
Create Tickets
Using this action block, after collecting information from users, your chatbot can create a ticket on Zendesk and acknowledge the user with the created ticket number. For example, you are creating an IT support chatbot that:- Collects user’s email address
- Category of the problem (Hardware, Software, Networking, Something else…)
- Sub-category of the problem (PC not starting, PC stuck …)
- Description of the problem
- Files/images to be attached
1
Connect your Zendesk account
Connect your Zendesk account by clicking on “+ Add account”, and choose it from the dropdown.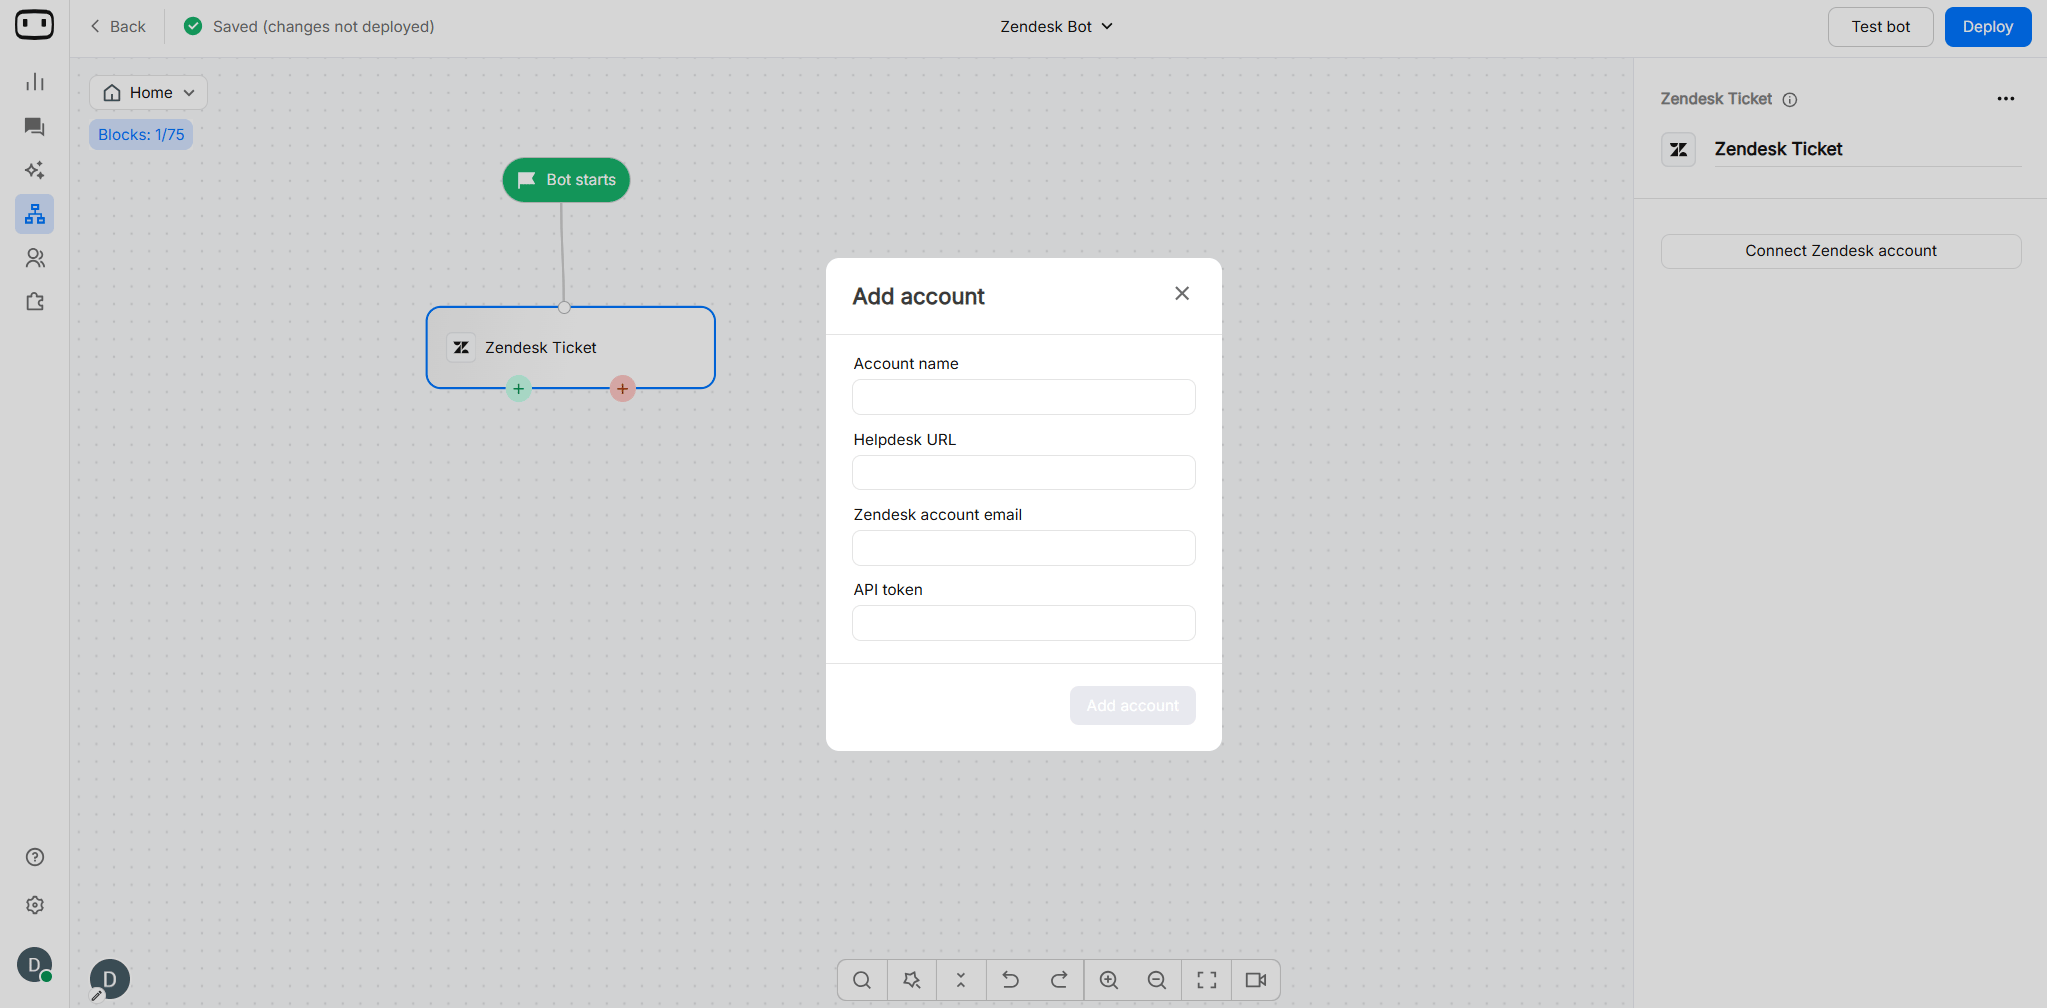
- Account name - General name for this account.
- Helpdesk URL - Domain on your Zendesk account i.e. https://wotnot2535.zendesk.com
- Zendesk account email - An administrator’s email address. It will be used to configure WotNot’s webhook on Zendesk (used for live chat for Zendesk).
- API token - API token created on Zendesk. Follow these steps
2
Configure the fields
Map the Zendesk fields on the left column with the respective WotNot variables which contain its data.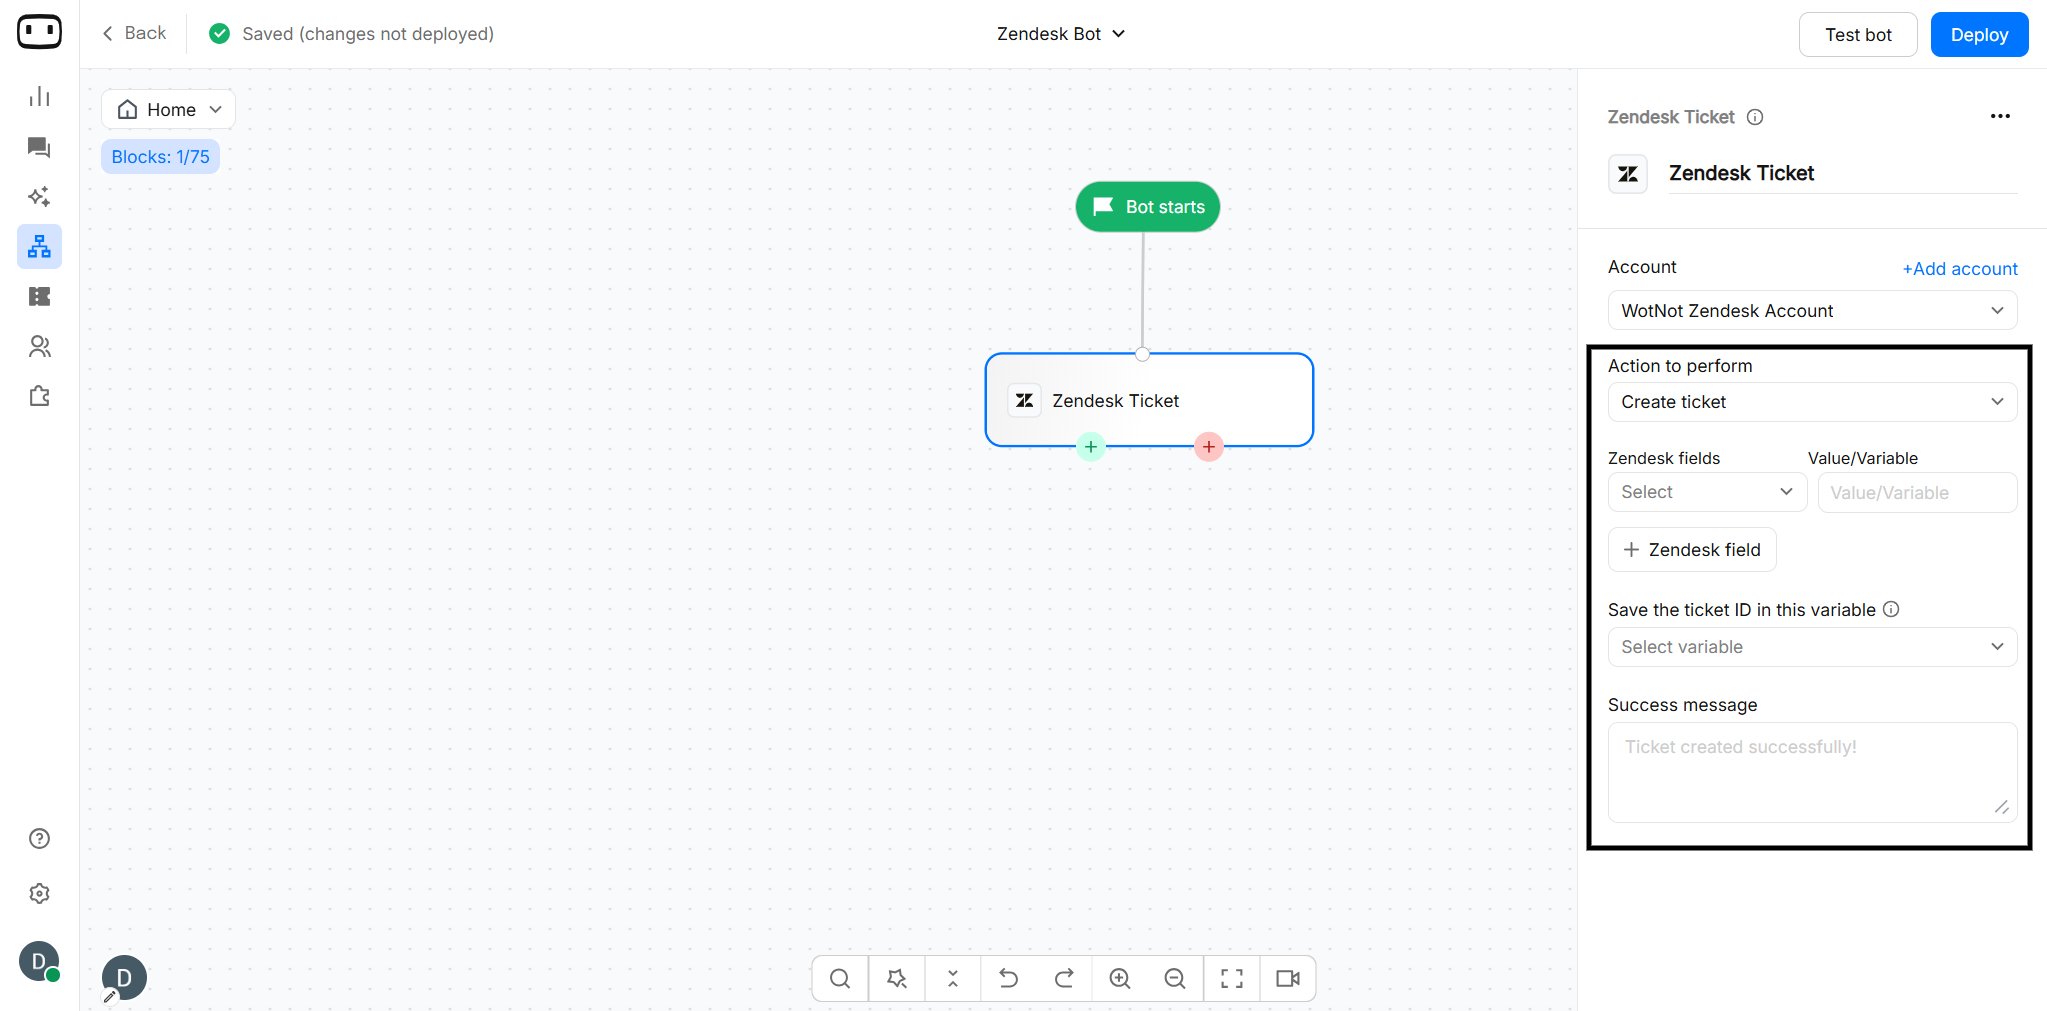
Make sure that you configure all the mandatory fields of your Zendesk account here. Otherwise, tickets may not be created due to missing field information.
3
Acknowledge the user
Using this action, you can fetch the status of a ticket from Zendesk. This helps users be informed of the progress being made on their tickets.
Get ticket status
Using this action, you can fetch the status of a ticket from Zendesk. This helps users be informed of the progress being made on their tickets.1
Connect your Zendesk account
Connect your Zendesk account by clicking on “+ Add account”, and choose it from the dropdown.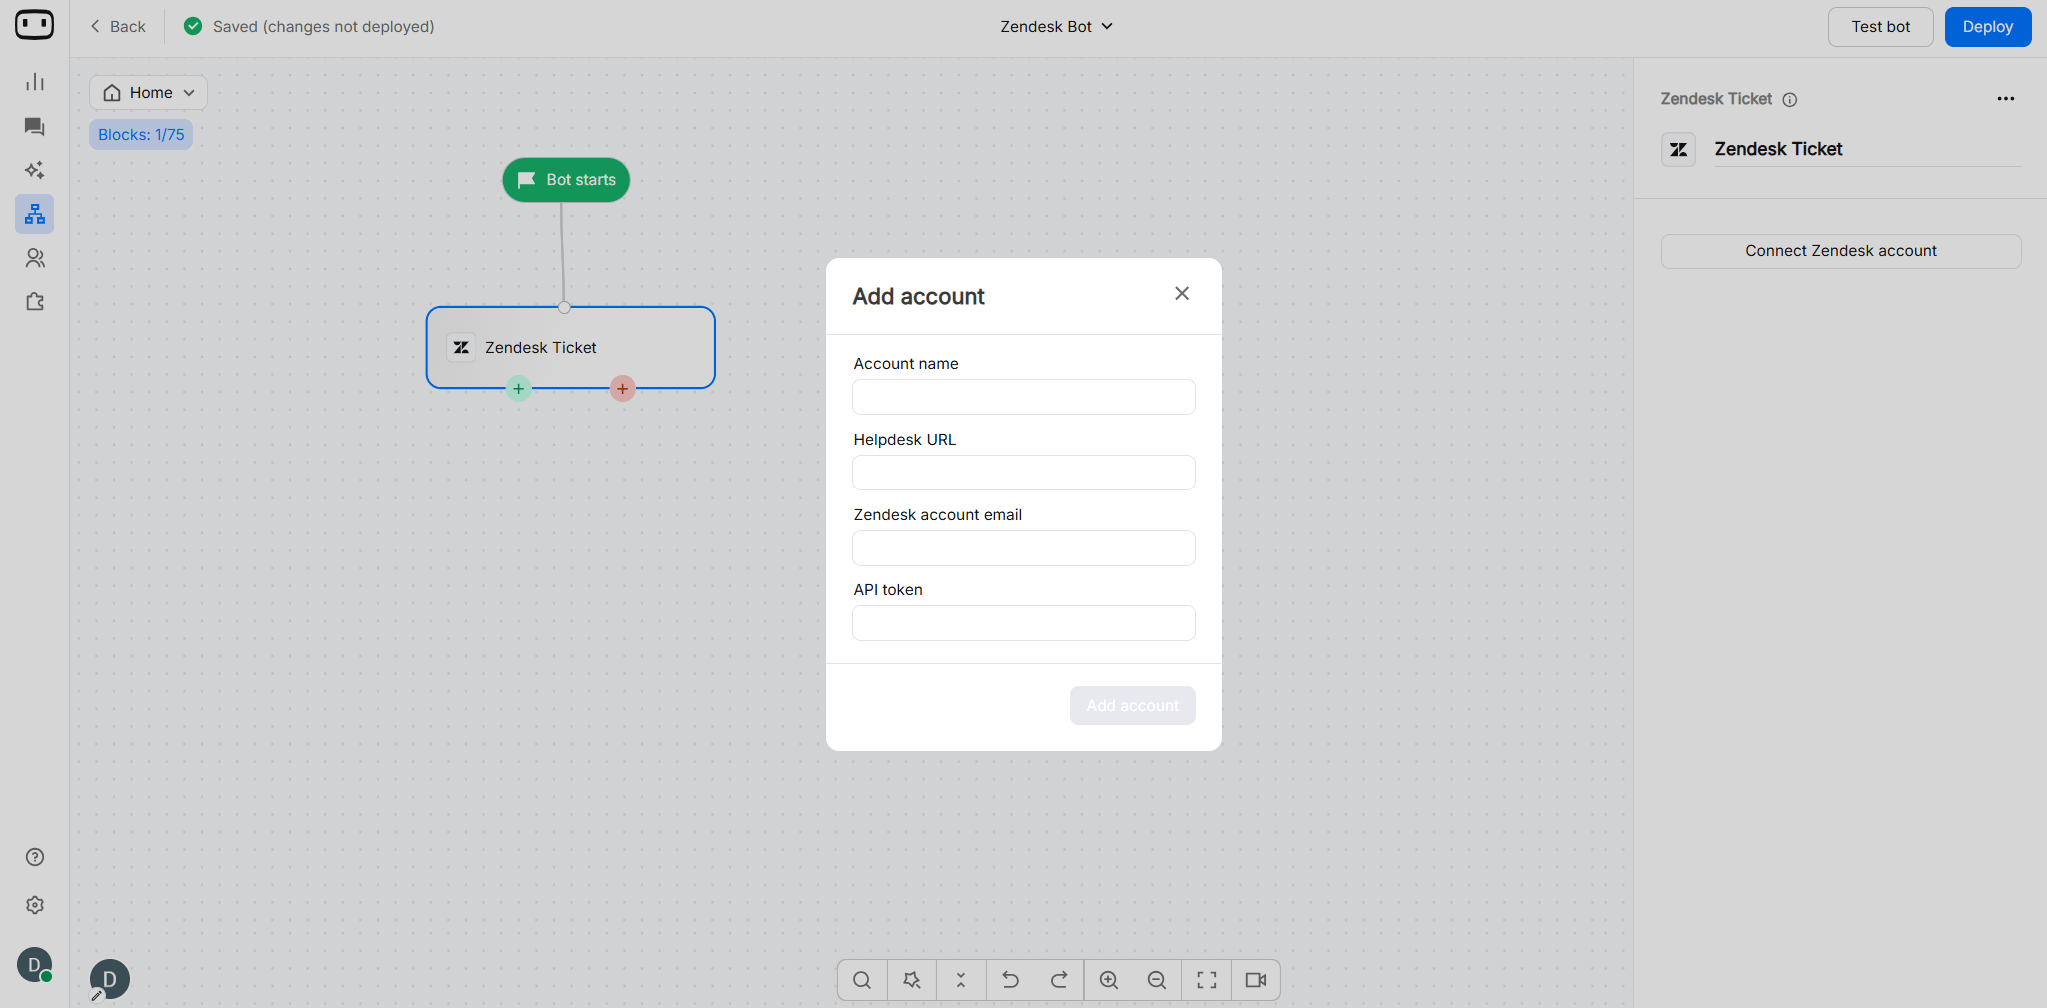
- Account name - General name for this account.
- Helpdesk URL - Domain on your Zendesk account i.e. https://wotnot2535.zendesk.com
- Zendesk account email - An administrator’s email address. It will be used to configure WotNot’s webhook on Zendesk (used for live chat for Zendesk).
- API token - API token created on Zendesk. Follow these steps
2
Save the response
In order to fetch the status of a ticket, we need to first collect the ticket number from the user.Use a “Collect input” action block to collect and store the ticket ID into a variable.Then choose that variable in the Zendesk action block and choose the list of fields you want to save.For example, you want to save the “Status”, “Last updated” fields and send a acknowledgement message to the user saying “The status of your #ticket_id# is #ticket_status#. It was last updated on #last_updated#”.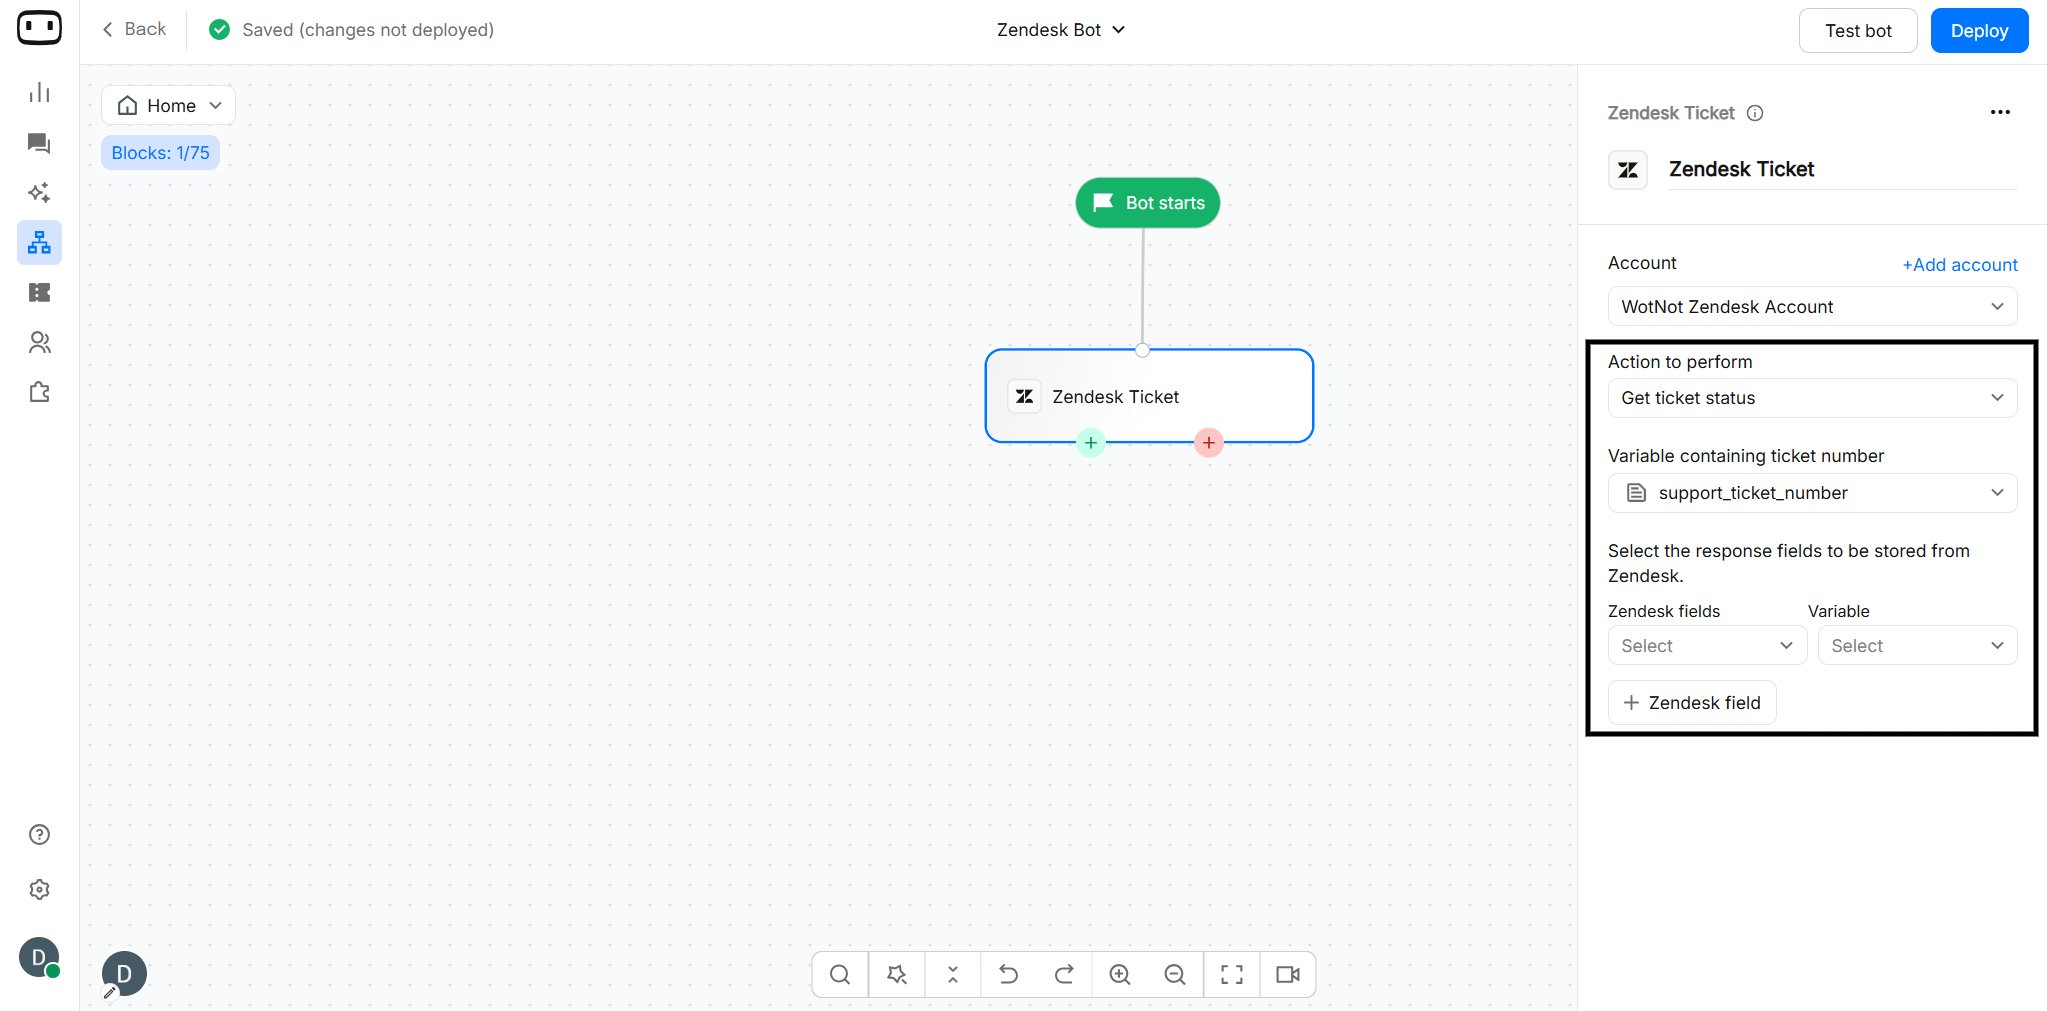
Route a chat to Zendesk
Use the Zendesk live chat capability when the visitor needs help from a human agent and your support team works in Zendesk. The live chat flow first creates a Zendesk ticket and then uses your Zendesk configuration and automation rules to assign the ticket to an agent. See Live chat via Zendesk for the complete setup.Mapping fields
When configuring the Zendesk action block, map the information collected by WotNot to the corresponding Zendesk ticket fields.Requester identity
The visitor information you collect in WotNot must be mapped to the corresponding Zendesk ticket fields. Before publishing the flow, verify which requester fields are mandatory in your Zendesk setup and make sure the corresponding WotNot variables are populated. Make sure the required requester information, such as an email address, is available before creating the ticket.Subject and description
Use the Subject field for a short summary of the issue. Use the Description field for the detailed customer request or conversation context.Priority and type
If your Zendesk workflow uses Priority or Type, make sure the value stored in the WotNot variable matches a value accepted by Zendesk.Tags
Tags help your support team categorize and filter tickets. You can map static values or WotNot variables to Zendesk tags.Custom fields
If your Zendesk account uses custom ticket fields, make sure those fields already exist before mapping them in WotNot. If a custom field is mandatory, map it to a WotNot variable before the ticket is created. Missing mandatory fields can prevent ticket creation.Live chat via Zendesk
With this action block, users can seamlessly engage in live conversations with your agents directly from the Zendesk portal. This eliminates the need for agents to access WotNot live chat, allowing them to communicate with users through ticket pages using comments.1
Connect your Zendesk account
Follow these steps to connect as mentioned aboveConnect your Zendesk account by clicking on “+ Add account”, and choose it from the dropdown.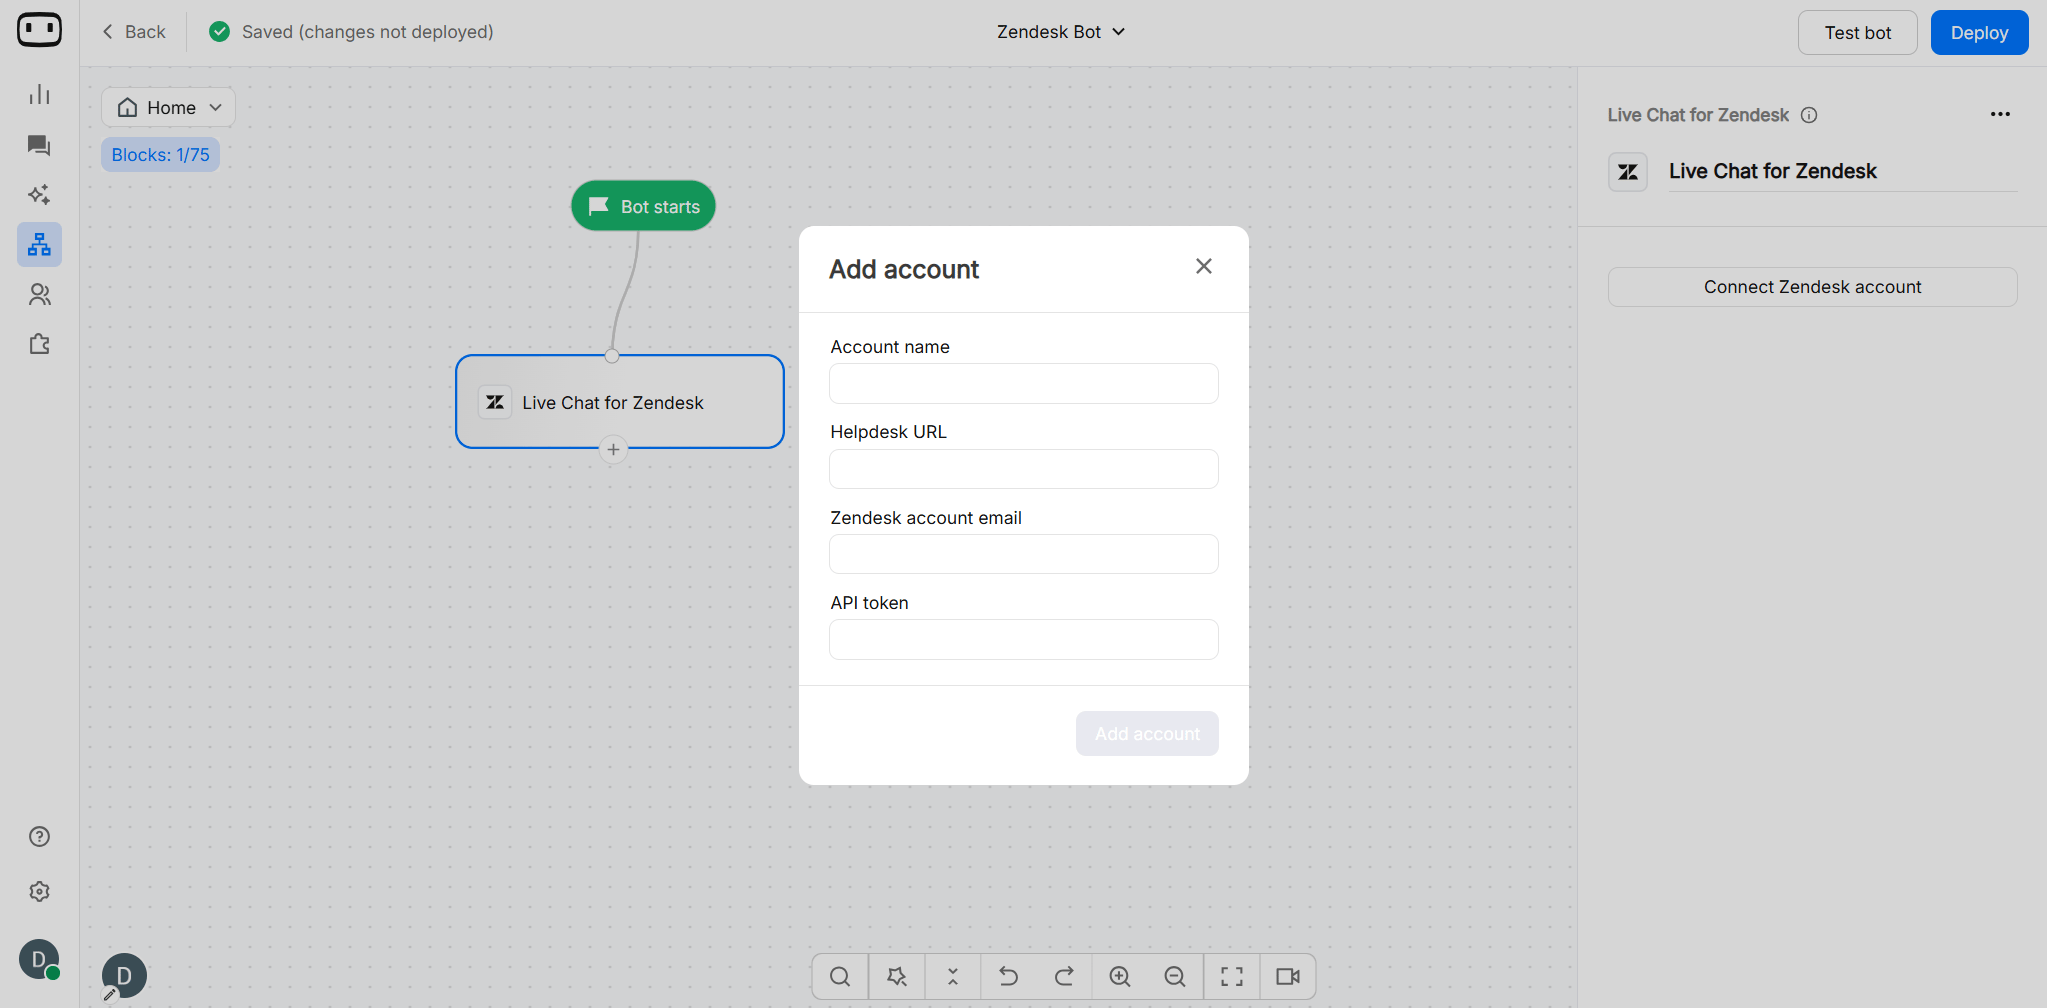
- Account name - General name for this account.
- Helpdesk URL - Domain on your Zendesk account i.e. https://wotnot2535.zendesk.com
- Zendesk account email - An administrator’s email address. It will be used to configure WotNot’s webhook on Zendesk (used for live chat for Zendesk).
- API token - API token created on Zendesk. Follow these steps
2
Mapping the required fields to create a ticket
n order to start a new live chat, the system needs to first create a ticket and assign it to your agent.Hence, map the Zendesk fields with the WotNot variables required to create a ticket on Zendesk.
3
Setup the acknowledgement messages
When the ticket is successfully created on Zendesk, you can choose the variable where the ticket ID is to be stored, and define a acknowledgement message like: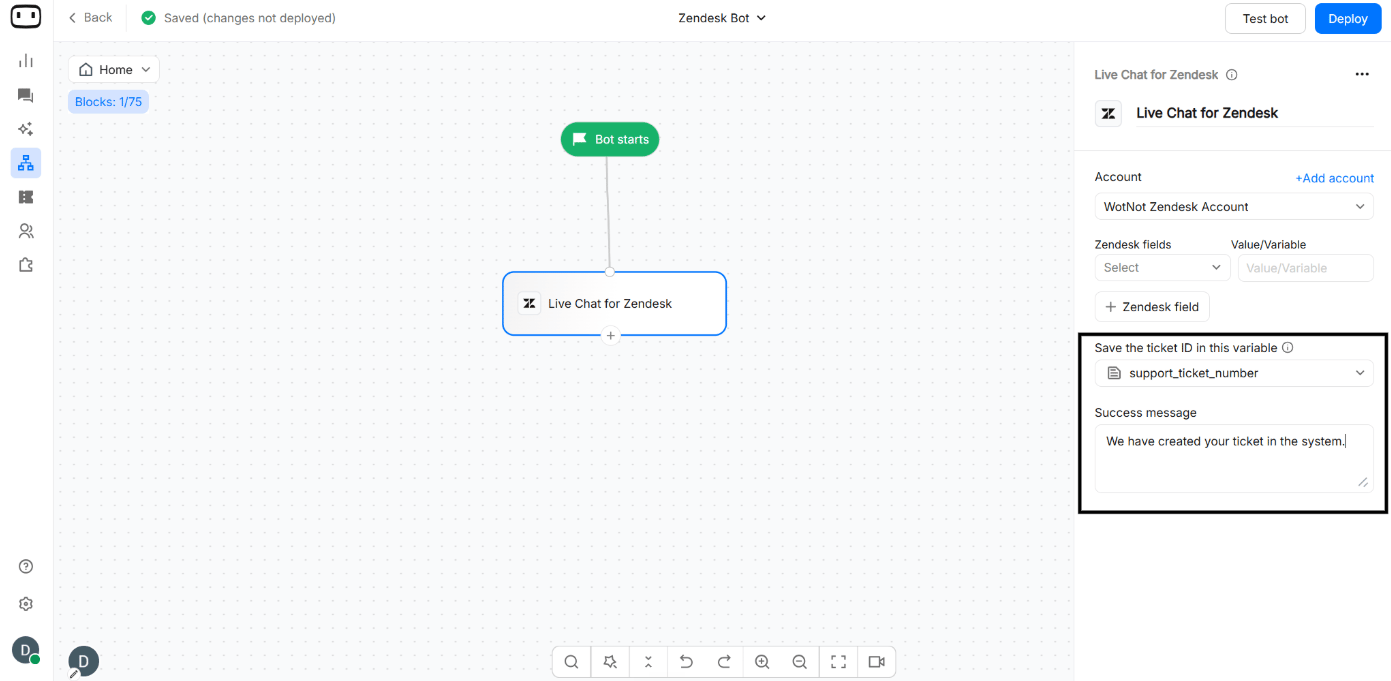
Your ticket #ticket_id# has been created. Our agent will be with you shortly.
If the agent to whom the ticket is assigned on Zendesk is not present on WotNot, the system will automatically add that person as a user on WotNot with an “Agent” role.
Live Chat for Zendesk in WhatsApp
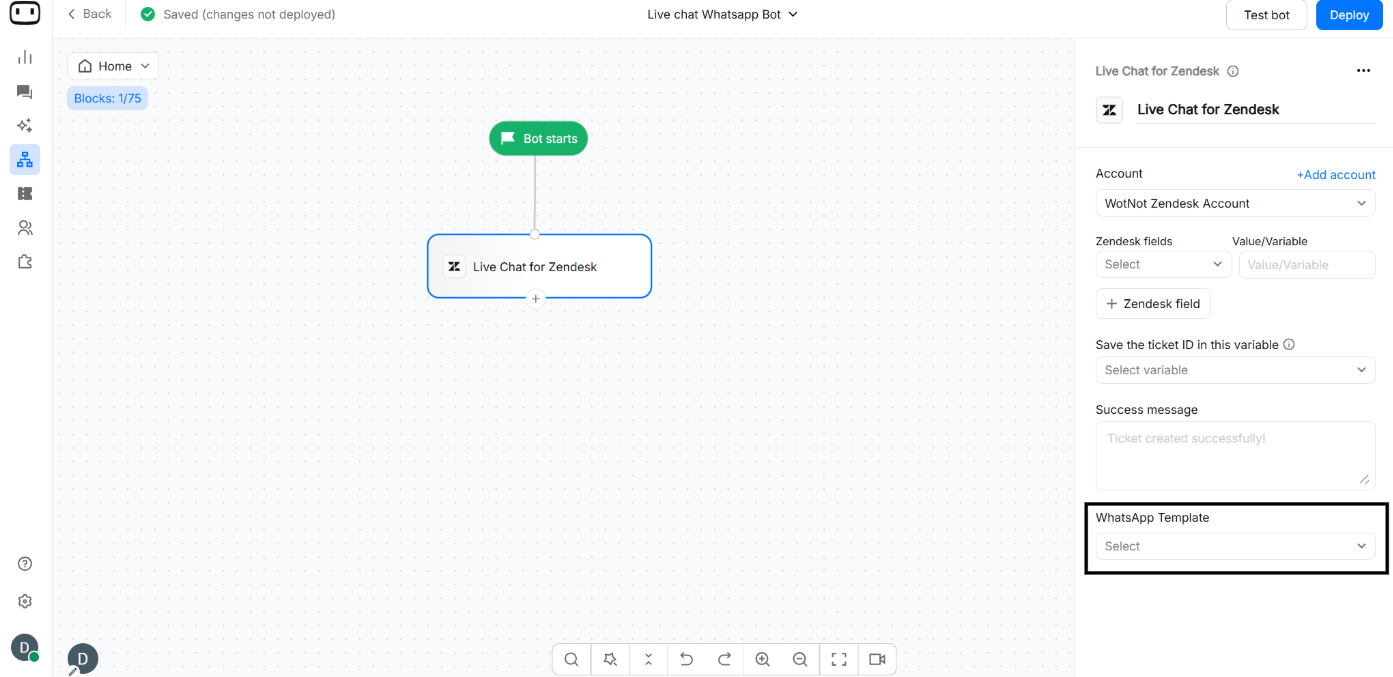
When using the “Live Chat for Zendesk” block in the WhatsApp channel, users must select a WhatsApp template.- The selected template will be sent to the user if a new comment is received from a Zendesk agent.
- A new conversation will be created using the selected template message and assigned to the same agent who added the comment.
- This behavior is implemented due to WhatsApp’s limitation on sending free-text messages after the user session window has closed.
Define a template message that clearly informs the user about the new comment on their ticket and encourages them to respond. When the user replies to the template message, the agent will be notified in Zendesk and can continue the conversation by adding comments with the required details.
Zendesk vs. WotNot Live Chat
Zendesk live chat is different from WotNot’s standard Live Chat experience.
For WotNot’s native agent handoff, see Talk to human.
Known behaviors
The following are some expected behaviors and limitations when integrating Zendesk with WotNot across different channels. These behaviors stem from platform restrictions and specific implementation choices to ensure optimal functionality.- Only bold and italic text formats are supported and will be displayed correctly in WhatsApp and the web channel. Other formatting styles will not appear as they do in Zendesk due to channel restrictions.
- Agents will not be notified in Zendesk when a conversation is closed from the WotNot side.
- The “Add Link” feature in Zendesk comments will not render the URL properly on WhatsApp or the chat widget. However, if a URL is added as plain text in the message, it will be automatically converted into a clickable link.
- Internal notes added by an agent in Zendesk will not appear on the WotNot Live Chat page and will not be visible to the customer.
- Multiple attachments added in a single Zendesk comment will be sent as individual messages to the user.
- Unsupported media types in certain channels will either be discarded or not sent to the user.
- If an agent adds a comment to a closed ticket, the following will occur:
- For WhatsApp, a new conversation will be created in WotNot with a template message.
- For the web channel, the comment will be ignored, and no further action will be taken on WotNot’s side.
Troubleshooting
My Zendesk token is invalid
My Zendesk token is invalid
Check that the API token or OAuth authorization is still valid.If the token was revoked, expired, or regenerated, reconnect Zendesk from Settings → Integrations and complete the authentication process again.
My Zendesk subdomain is incorrect
My Zendesk subdomain is incorrect
Verify that you entered the correct Zendesk subdomain.For example, if your Zendesk URL is
https://company.zendesk.com, enter company as the subdomain.The ticket was created without a requester
The ticket was created without a requester
Make sure the requester information is available in WotNot and mapped correctly to the Zendesk requester field.If your Zendesk configuration requires a requester email address, make sure the conversation collects the customer’s email before creating the ticket.
My custom field was rejected
My custom field was rejected
Verify that the custom field exists in Zendesk and that the value being sent from WotNot matches the field’s expected format.Also check whether the custom field is required and whether the supplied value is valid for the available field options.
The ticket status lookup returns nothing
The ticket status lookup returns nothing
Verify that the ticket ID being passed to Zendesk is correct.Make sure the variable containing the ticket ID is populated before the Zendesk status lookup runs.
Chats are not reaching Zendesk agents
Chats are not reaching Zendesk agents
Verify that the Zendesk integration is connected and that the Talk to human block is configured correctly.Check the routing and agent availability settings in Zendesk. Then test the flow again to confirm that the conversation is being transferred successfully.