

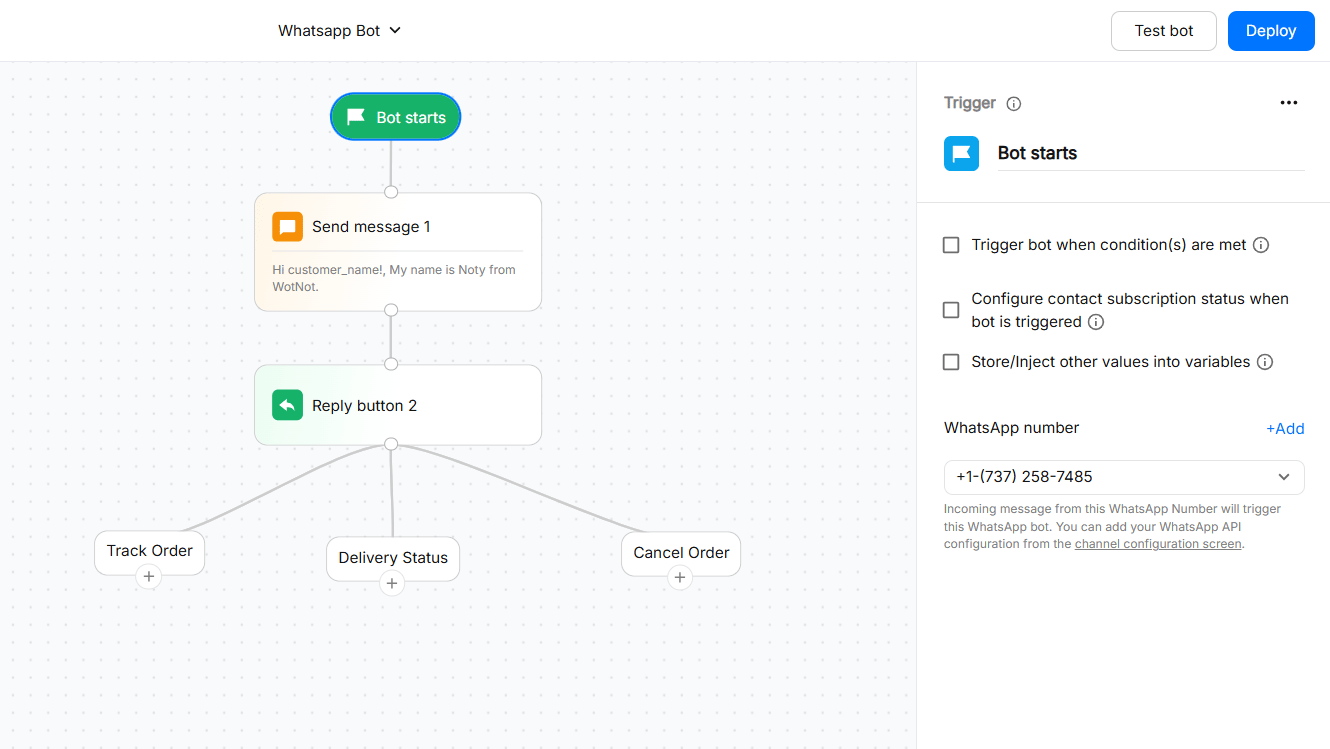
WhatsApp has more limitations on interactive elements than the web channel. For example, reply buttons are limited to three options, and lists and other interactive formats have their own limits. Rich-text formatting also differs from the web channel. See Action blocks for the WhatsApp-specific blocks available in WotNot.
Before you start
Complete the following prerequisites before connecting WhatsApp to WotNot. Completing these steps in the right order can help avoid delays during setup.Getting WhatsApp API access
WotNot uses an embedded signup approach to create a WhatsApp API for a new business.Available on the STARTER plan and above.
1
Initiate the embedded signup process
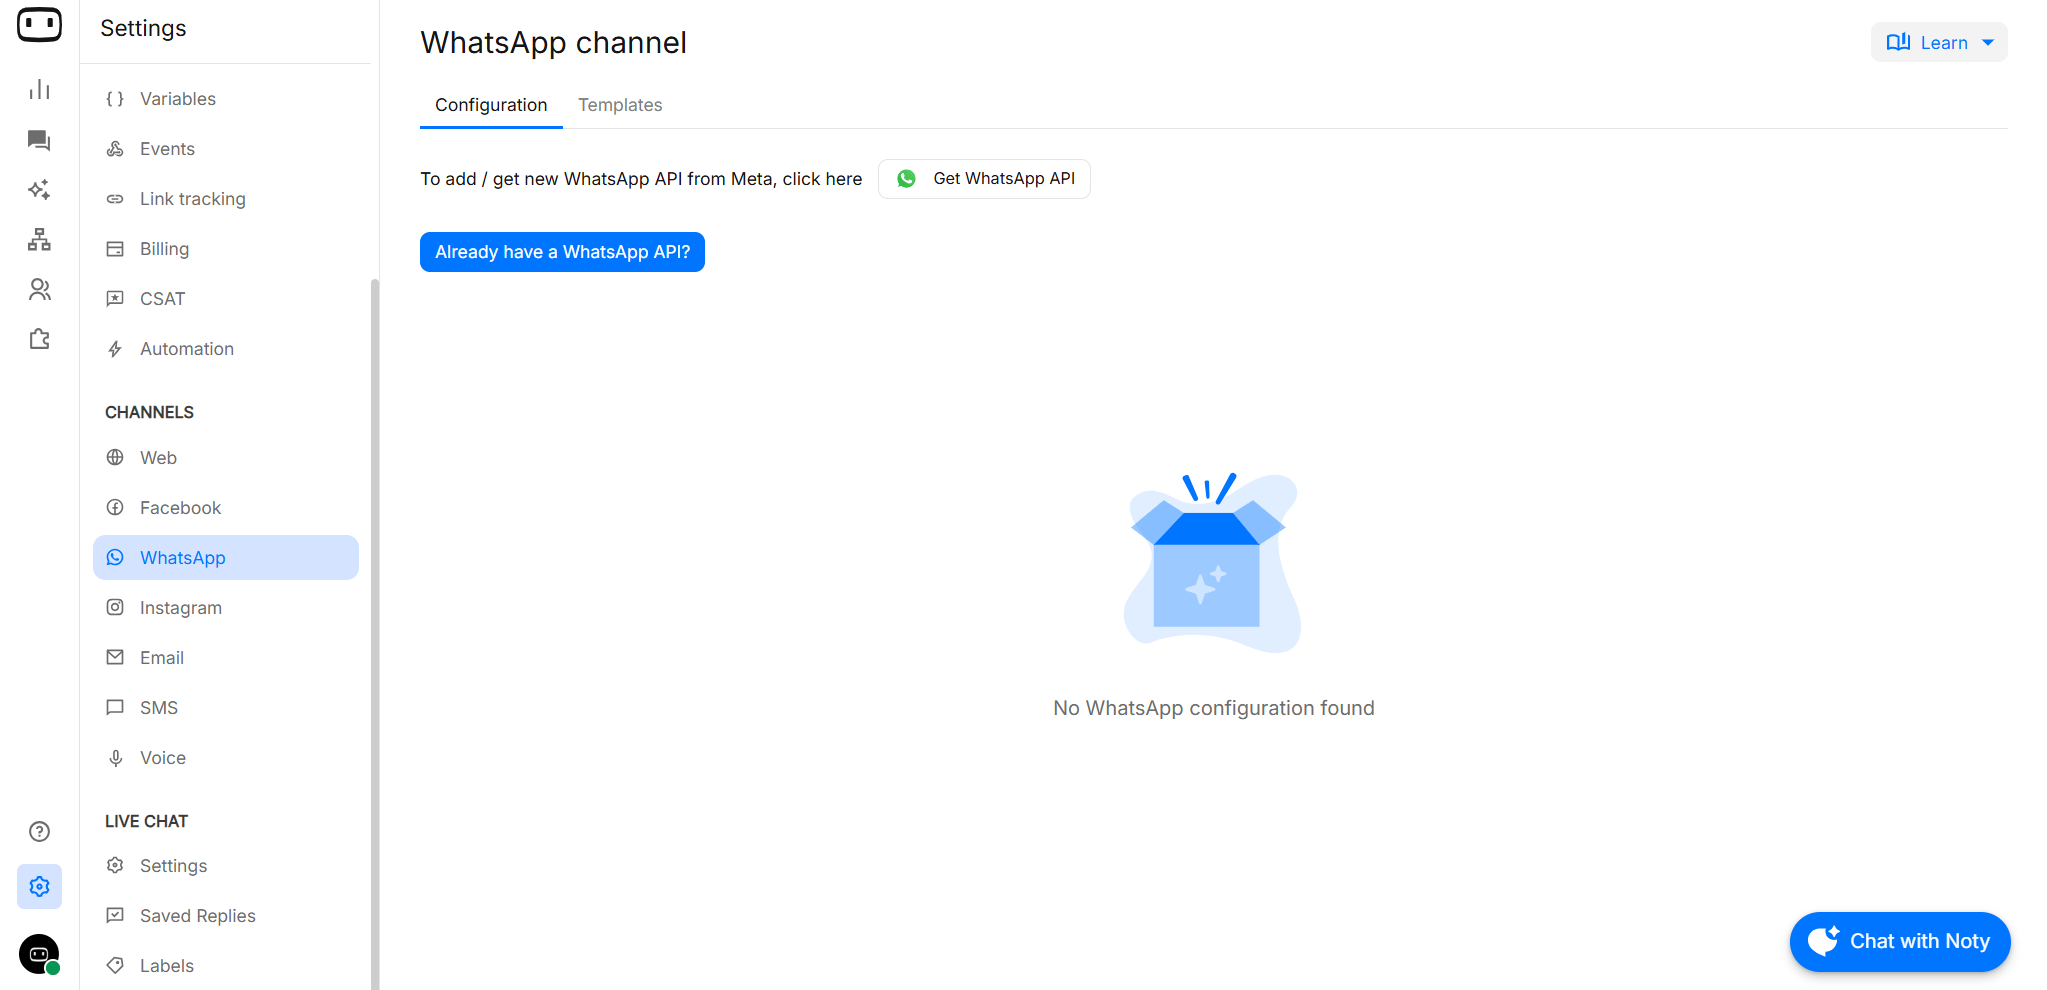
- Go to Channels -> WhatsApp -> Configuration
- Click on ‘Get WhatsApp API’
- This will open the Facebook onboarding popup
2
Choose a Facebook business account
Meta requires a Facebook business account to be associated with your WhatsApp number.You can see the existing portfolio in the dropdowns, or choose to create a new Facebook business account.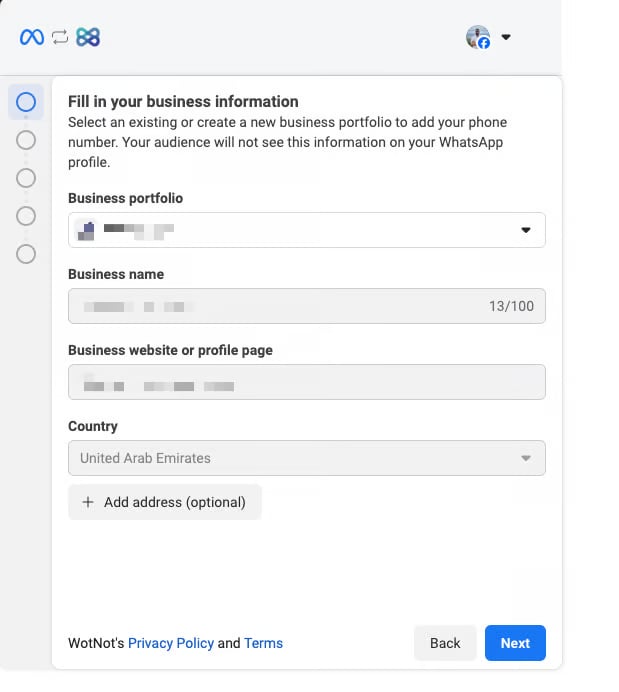
- Refer this video for complete walkthrough of the steps:
3
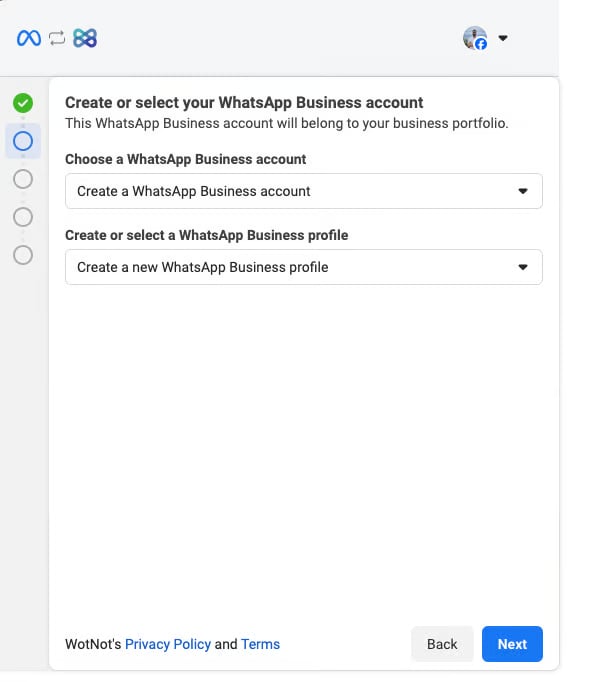
Create a WhatsApp business account
- Choose ‘Create a new WhatsApp Business account’
- Choose ‘Create a new WhatsApp Business profile’.
4
Create your WhatsApp profile
Here you add information that others will see about your company when they message your WhatsApp number.WhatsApp business account name - It is an internal name only visible inside your Meta business account.WhatsApp business display name - This name is what contacts will see on your WhatsApp profile.Category - Select the category that best describes your business.Timezone - Local timezone of your business.Business description - Short description about your business.Website - Website URL of your business.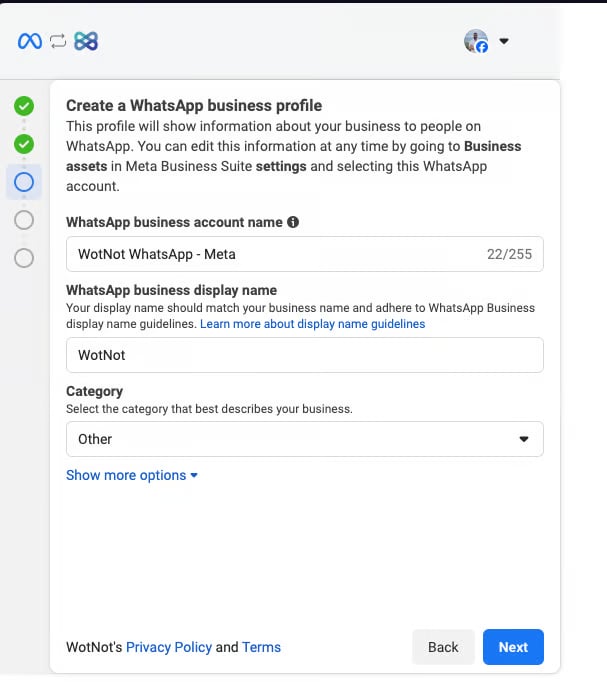
5
Add your phone number for WhatsApp
This is the number that people will see when they chat with your business.You will be required to verify this number with a text message or a phone call.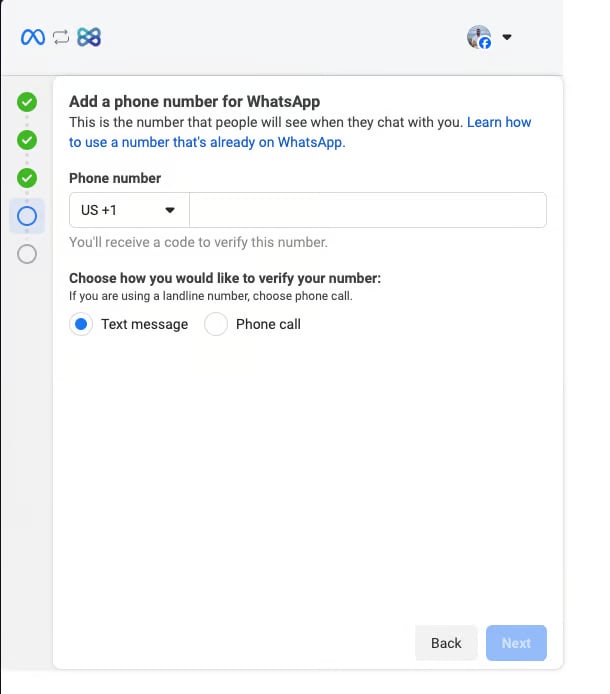
Make sure this number does not have an active WhatsApp account.If you do, delete the WhatsApp account.
6
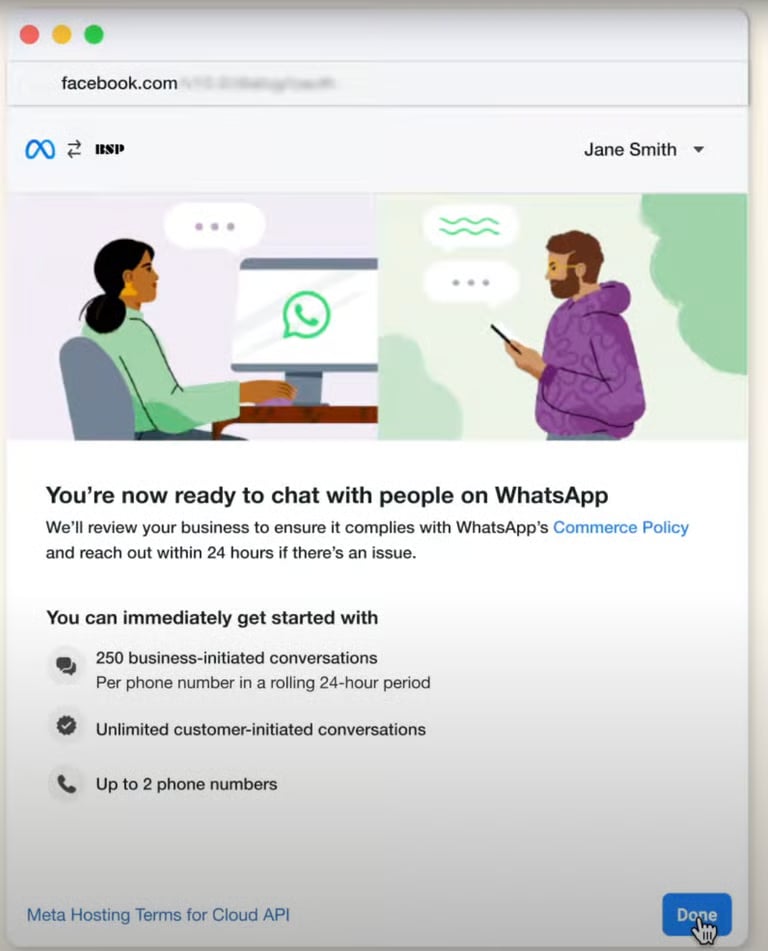
Once you complete the verification of the number, your WhatsApp account will be connected to your WotNot account.
Business verification
Meta has a mandatory requirement for the business to have their Facebook Business Manager (FBM) verified. Without this being verified, you will not be eligible to get a WhatsApp API.Check FBM verification status
- Open the FBM account for which you want to get a WhatsApp API
- Go to the Security page and see this section
Getting FBM verified
1
Start 'Verification'
Click on ‘Start Verification’ under ‘Business Manager’s Security Center’ to initiate the verification process.
2
Provide 'Business Details'
Provide your business’s details, including the legal business name, address, phone number and website.
Make sure that the details you submit exactly match the details of your legal business entity. Also make sure that your business’s website is active and is HTTP compliant
3
Confirm 'Business Details'
Based on the information provided, Meta looks for the matching records for you to select from.If no matching record is found, upload supporting documents to confirm the details you entered
4
Method to confirm your connection
Once you have uploaded the documents related to your business, Meta will ask you to select the method through which you will be getting confirmation code. You will need to submit this code to complete verification process.Below are the available methods;
- Email: An email is sent to your email address with code
- Phone Number: A call is made to this number with the code
- Text Message: A text is made to this number with the code
- Domain Verification: A DNS record is to be added to your site’s web host or DNS provider
After you submitted the verification, a decision can be made in as little as 10 minutes or as long as 14 working days.You’ll receive a notification when the review is complete. If you receive confirmation that your business is verified, there’s nothing more you need to do
- The company’s website is active, with SSL, and is complete, containing the company’s name, address, and phone number, which matches the one provided by the Business Manager
- The account email is from the same domain as the company’s website provided in the documentation i.e. if your website is wotnot.io your email should also contain the same domain i.e. test@wotnot.io
- If the verification will be made through the phone number, make sure you can receive the call. If the phone has IVR, disable it temporarily
- The company’s trade name in the documentation is the same one used on the website and the Facebook page. If different, the names need to be related in some way on the website. For example, at the footer, enter “Company ABC powered by Company D”
Enabling 'Start Verification'
In order to see the ‘Start Verification’ option enabled, you will need to create the App first. You can follow the following steps;Step 1: Go to ‘developers.facebook.com’Step 2: Create a Business AppStep 3: Go back to ‘Security Center’
A phone number
You need a phone number to connect to your WhatsApp Business API account. The number:- Must be able to receive an SMS or phone call for verification.
- Must not have an active personal or WhatsApp Business account.
- If the number is already registered with WhatsApp, you may need to delete the existing WhatsApp account before using the number for the API.
- Should be dedicated to the WhatsApp Business API setup if you want to avoid disrupting an existing WhatsApp account.
Moving an existing WhatsApp number to the Business API can affect how that number is currently used. Make sure you understand the impact before migrating an existing number.
Provider setup
Meta
Meta is a bit complicated, as it involves navigating across multiple pages.- Goto Settings > Channel Configuration > WhatsApp > Configuration
- Click “Create a configuration”
- Enter the “Phone number”
- Navigate to Facebook developer portal
- Open the “App” that you created for WhatsApp API
- Copy “App ID” from the header
- From the navigation menu on the left,
- Goto WhatsApp > API Setup
- Copy “Phone number ID”
- Copy “WhatsApp Business Account ID”
- Paste the “Permanent token” (Learn how)
- Finally, paste all the copied values on the WotNot configuration screen and hit “Save”.
- Test by sending “Hi” to your WhatsApp number
360Dialog
- Goto Settings > Channel Configuration > WhatsApp > Configuration
- Click “Create a configuration”
- Enter the phone number
- Choose “360dialog Cloud” from the list
- Enter the “API key” from your 360dialog account
- Hit “Save”
- Test by sending “Hi” to your WhatsApp number
WotNot also supports 360Dialog on-prem. Choose this option on the Provider dropdown.
Twilio
- Goto Settings > Channel Configuration > WhatsApp > Configuration
- Click “Create a configuration”
- Enter the “Phone number”
- Login to your Twilio account
- Navigate to the Account > Settings
- Copy the “Account SID”
- Copy the “Auth token”
- Paste these values on the WotNot configuration screen and hit “Save”
- Test by sending “Hi” to your WhatsApp number
GupShup
- Goto Settings > Channel Configuration > WhatsApp > Configuration
- Click “Create a configuration”
- Enter the “Phone number”
- Login to your GupShup account
- Open the App you created for WhatsApp
- Goto Settings
- Copy “App name”
- Copy “App ID”
- Copy “App API Key”
- Paste these values on the WotNot configuration screen and hit “Save”
- Test by sending “Hi” to your WhatsApp number
TechAlpha
- Go to Settings > Channel Configuration > WhatsApp > Configuration
- Click “Create a configuration”
- Enter the “Phone number”
- Reach out to your Account Manager at TechAlpha
- Copy the “WhatsApp Business Account ID”
- Copy the “API Key”
- Paste these values on the WotNot configuration screen and hit “Save”
- Test by sending “Hi” to your WhatsApp number
Publishing the agent
Once your WhatsApp number is connected, you can connect it to your WotNot agent.- Select WhatsApp as the channel.
- Open the bot you want to publish.
- Go to the Trigger block.
- Select the WhatsApp phone number you connected in the channel configuration.
- Deploy the bot.
The WhatsApp number selected in the Trigger block determines the WhatsApp configuration and approved templates available to the bot.
Testing on WhatsApp
After publishing, test the complete conversation from an actual WhatsApp account. Before testing, make sure you have:- A WhatsApp number that can receive messages.
- A test contact that can message your business number.
- An approved WhatsApp template if you want to test a business-initiated conversation.
- The WhatsApp number selected in the bot’s Trigger block.
Testing the chatbot
Learn how to test your agent before making it available to users.
Messaging rules
The 24-hour window
When a customer sends a message to your WhatsApp business number, a 24-hour customer service window begins. During this window, you can respond to the customer’s messages without using a WhatsApp template. Once the 24-hour window expires, you cannot send a regular message to that contact. To initiate or continue the conversation outside the window, you must use an approved WhatsApp template.Send template
Send an approved WhatsApp template during a bot conversation.
WhatsApp templates
Learn how to create and submit WhatsApp templates for Meta approval.
Messaging limits and quality rating
Messaging limits and quality rating
Learn how WhatsApp messaging limits and quality ratings work and how to monitor them.
Cost
Cost
Learn how WhatsApp conversation pricing works.
Optional extras
Green tick verification
Official Business Account
Learn about eligibility and how to request Official Business Account verification.
WhatsApp-specific blocks
WotNot provides action blocks designed specifically for WhatsApp’s messaging capabilities.Reply buttons
Send predefined reply options that users can select directly in WhatsApp.
List
Present multiple options in a WhatsApp list format.
Catalogue
Display products from your connected WhatsApp catalogue.
WhatsApp Flow
Create structured, multi-screen interactions using WhatsApp Flows.
Collect location
Allow users to share their location through WhatsApp.
Send template
Send an approved WhatsApp template during a conversation.
WhatsApp interactive components have platform-specific limits. For example, reply buttons support up to three options. Lists, catalogues, and flows have their own restrictions.
Troubleshooting
Number connected but messages are not arriving
Number connected but messages are not arriving
Check the following:
- Confirm that the WhatsApp number is connected successfully in Settings > Channel Configuration > WhatsApp > Configuration.
- Verify that the correct phone number is selected in the bot’s Trigger block.
- Send a test message such as Hi from a different WhatsApp number.
- Confirm that the provider credentials are correct.
- If you use Meta, verify the Phone Number ID, WhatsApp Business Account ID, App ID, and Permanent Token.
- If you use another provider, verify the credentials supplied by that provider.
WhatsApp template was rejected
WhatsApp template was rejected
Meta reviews WhatsApp templates before they can be used.Check that your template:
- Clearly explains the purpose of the message.
- Uses the correct template category.
- Does not contain misleading or unclear content.
- Uses correct spelling and grammar.
- Uses variables correctly.
- Follows WhatsApp Business and messaging policies.
Creating a WhatsApp Template
Learn how to create and troubleshoot WhatsApp templates.
Message is failing outside the 24-hour window
Message is failing outside the 24-hour window
If the customer has not messaged your business within the last 24 hours, you cannot send a regular free-form WhatsApp message.Use an approved WhatsApp template to initiate or continue the conversation.
Send template
Learn how to send an approved WhatsApp template.
Interactive elements are rendering as plain text
Interactive elements are rendering as plain text
WhatsApp supports a different set of interactive elements than the web channel.Check that:
- The action block you are using is supported by WhatsApp.
- The selected option is configured correctly.
- The message format is supported by WhatsApp.
- You are not relying on web-specific formatting or interactions.
Messaging limit has been reached
Messaging limit has been reached
WhatsApp applies limits to the number of unique customers you can proactively contact during a rolling 24-hour period.Check your current messaging limit in WhatsApp Manager and review your recent outbound activity.If your quality rating has decreased, reduce negative feedback by sending relevant messages only to opted-in contacts and avoiding excessive messaging.
Messaging limits and quality rating
Learn how messaging limits and quality ratings work.
Quality rating has dropped
Quality rating has dropped
Your WhatsApp quality rating is influenced by how recipients respond to your messages.A rating can be affected by:
- Users blocking your business.
- Users reporting your messages.
- Sending messages to contacts who did not opt in.
- Sending messages that are not relevant or useful.
- Sending messages too frequently.