

Available on all plans.
Installing the chat bubble
To install the chat bubble on all the pages of your website, follow these steps:Getting your code Snippet
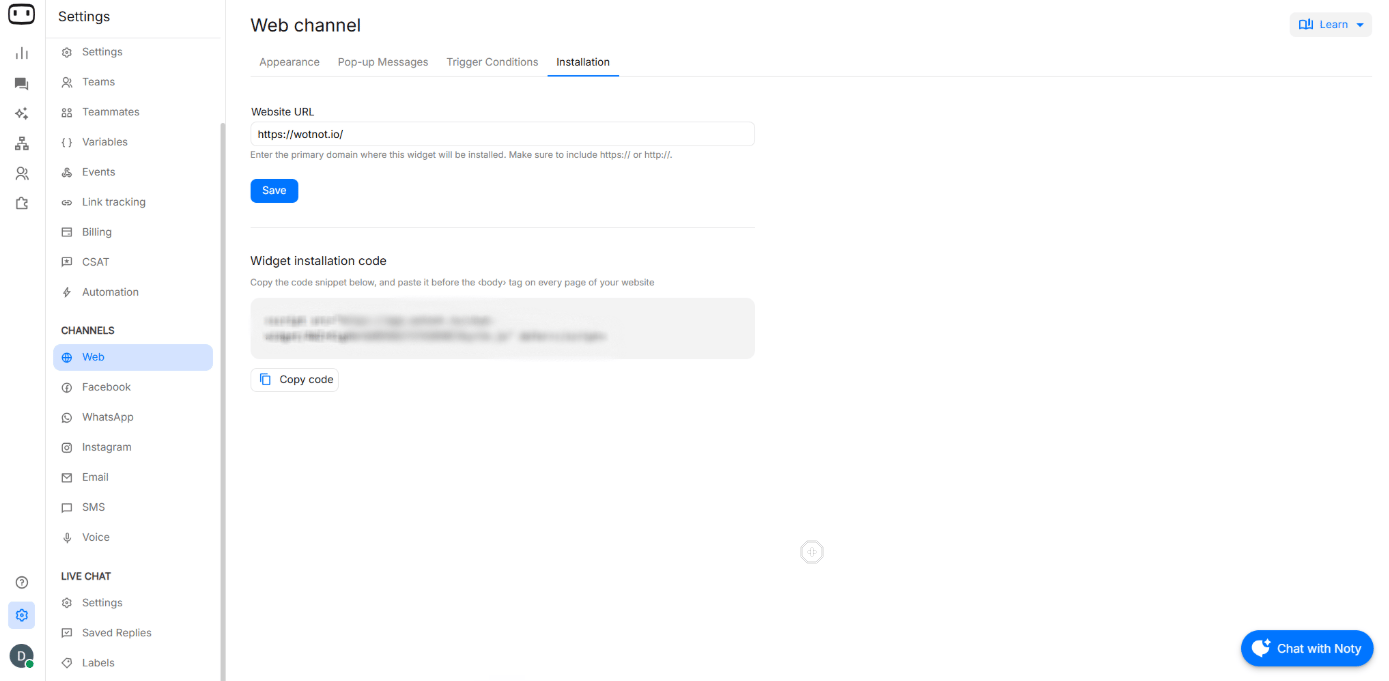
- Goto Settings > Web > Installation
- Enter the domain where you want to launch your chatbot
- Copy the “Widget installation code”
Paste the code snippet on your website
Copy the JS Snippet provided in this section, and paste it anywhere in your website’s code between the <body> … </body> tags. You must include the snippet on every page you want your Chatbot to appear on.Verifying it works
After adding the snippet, verify that the agent is active and has a deployed version.- Open the agent in WotNot and make sure its status is Active.
- Confirm that the latest version of the agent has been deployed.
- Open the published website and check whether the WotNot widget appears
- Open the widget and send a test message to confirm that the agent responds correctly.
Subdomains
Each WotNot account only supports one domain. For example, if your main website is w, you can also use the widget on subdomains such as blog.wotnot.io or app.wotnot.ioEmbedding in a page section
The iframe method
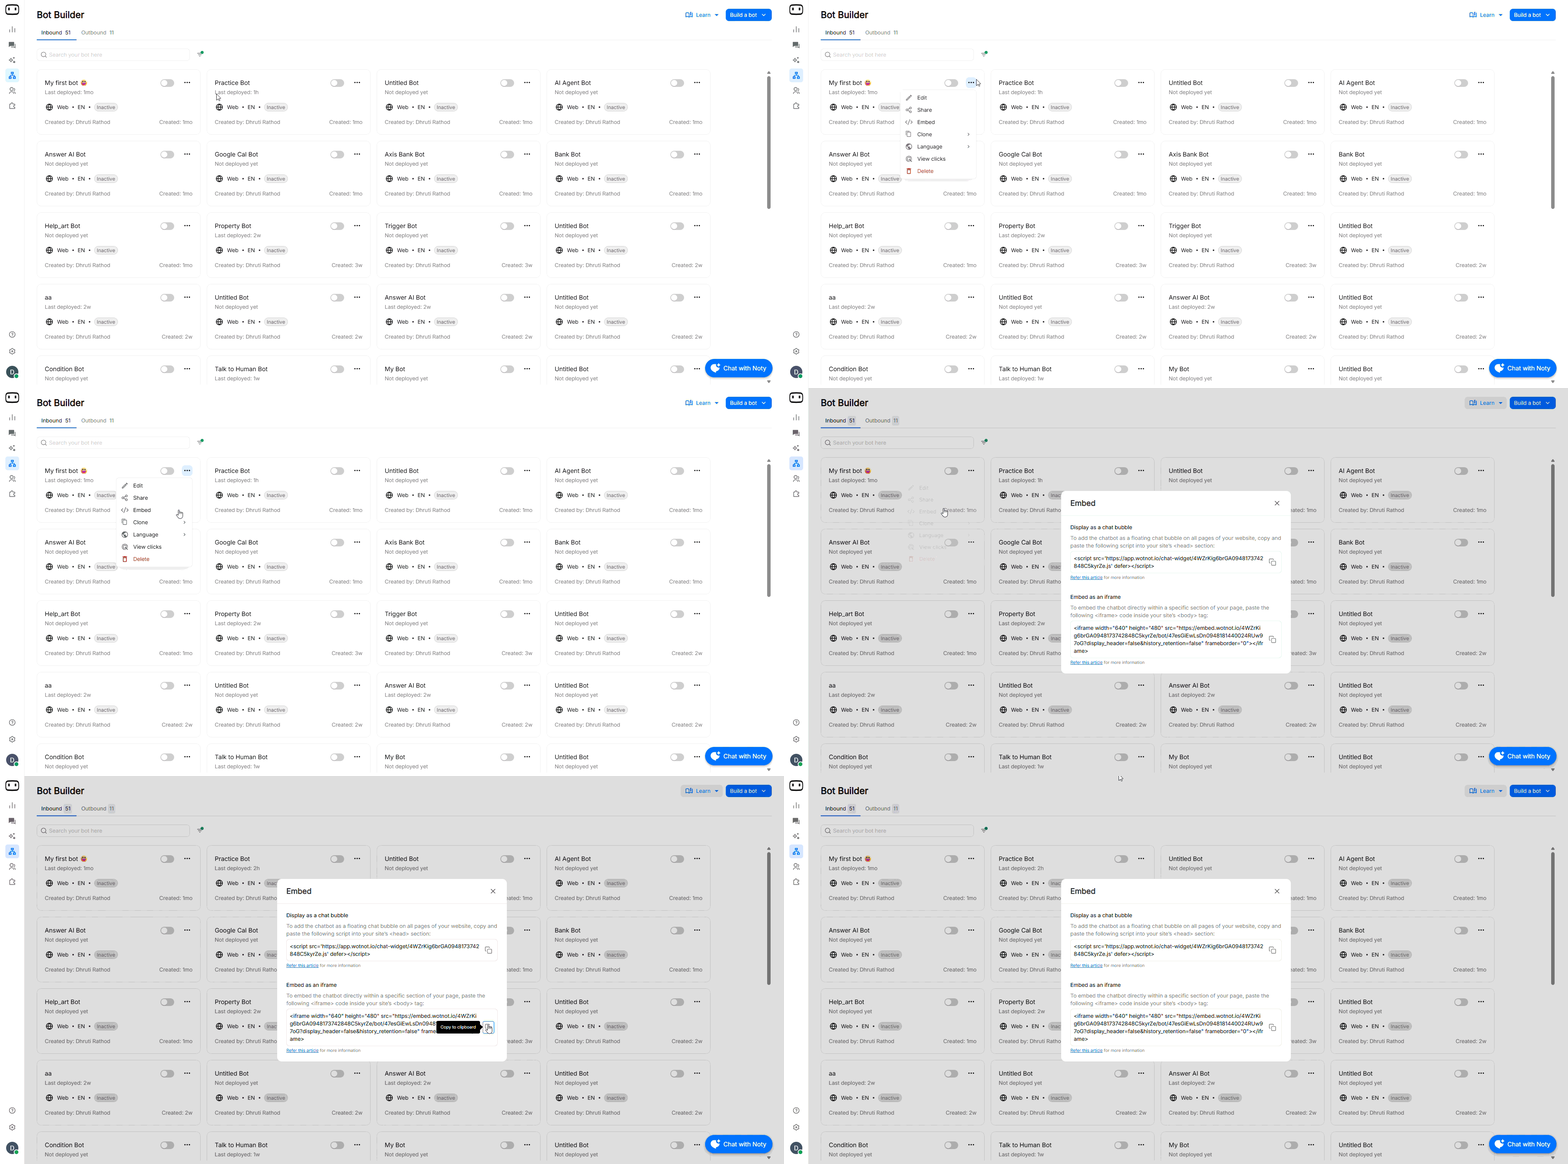
Embeds the chat widget inside a section of a webpage. To install an iframe:- Go to Bot builder
- Choose the 3 dots menu of the bot you want to iframe
- Choose “Embed”
- Copy and paste the iframe code on your webpage
Passing data into the widget
If you want to send external data to the chatbot, you can use this option. This is pretty useful if your use case involves the chatbot being installed inside a post-login environment where the bot is supposed to have context of the user talking to it (i.e. name, email, plan, account id etc.)From URL query parameters
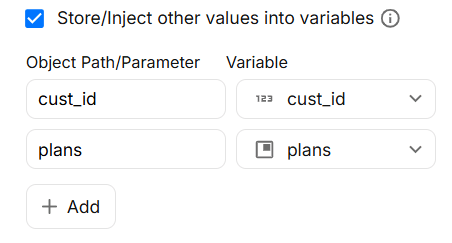
With this method, when the WotNot snippet is loaded on the website for the first time, the defined query params and their values will be stored in the WotNot variable. For example, if your URL is the followingwww.wotnot.io?cust_id=1234&plan=9896
You can choose to store the values of cust_id and plan on the trigger action block.
From a JSON payload in the snippet
With this method, you can inject a JSON payload inside the WotNot’s code snippet and map the objects to be stored in the trigger action block. To do this you need to add the following object with your desired fields in the WotNot code snippet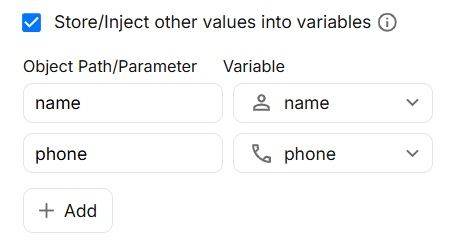
Why this matters
Use an inline iframe when the chatbot is part of a page experience, such as a support section, product page, onboarding flow, or account dashboard. Use the floating widget when you want visitors to access the chatbot from anywhere on the website without taking up page space.Platform guides
Use the platform-specific instructions below to add the WotNot snippet to your website. The shared installation, deployment, embedding, and data-passing behaviour described above applies to all platforms.WordPress
1
Copy the code snippet
Go to Settings > Web > InstallationEnter the domain where you want to launch your chatbotCopy the “Widget installation code”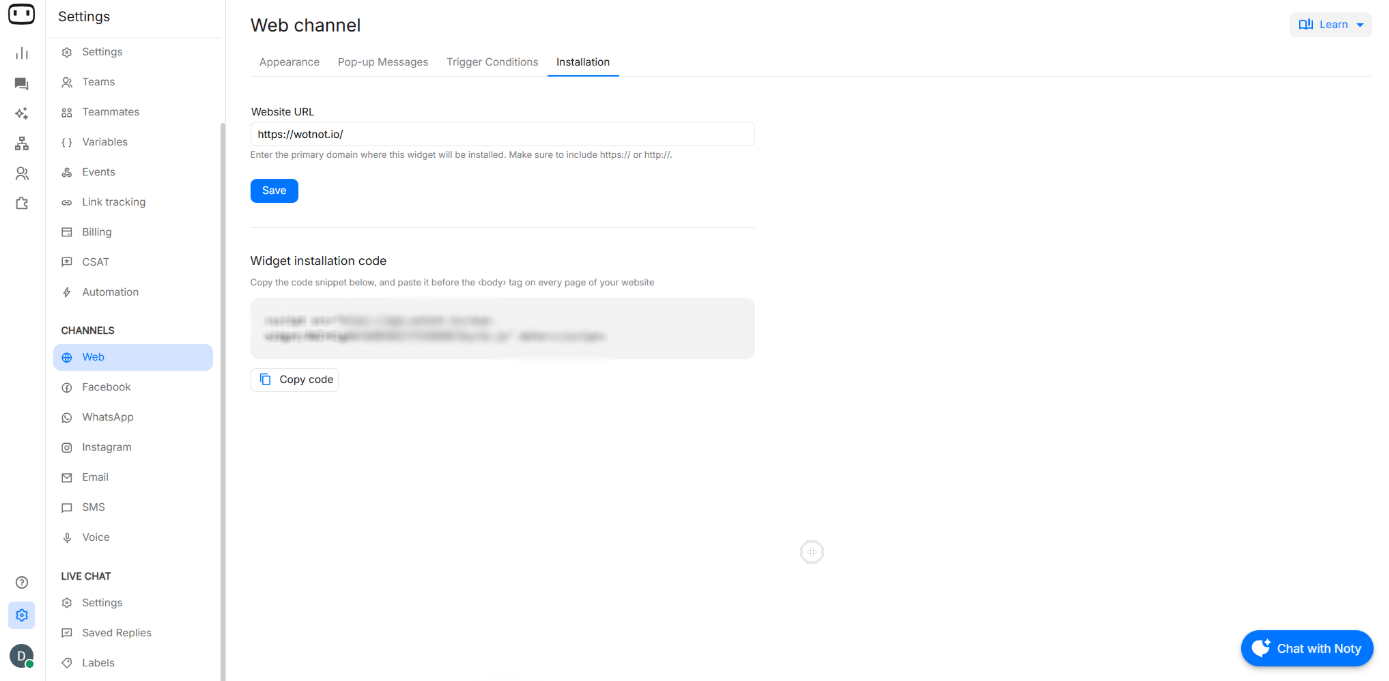
2
Adding the code on WordPress
Using a plugin:
- Go to WordPress Dashboard > Plugins > Add New.
- Search and install Insert Headers and Footers.
- Click Install Now, then Activate the plugin.
- Navigate to Settings > Insert Headers and Footers.
- Paste your WotNot chatbot script into the Scripts in Header section.
- Click Save to apply the changes.
- If the chatbot does not appear immediately, try purging your website cache. This may be required if you’re using a caching plugin or a CDN like Cloudflare.
Every page Installation
- Navigate to Elementor > Custom Code (Pro version required).
- Click Add New.
- Name your script (e.g., Chatbot).
- Paste the chatbot script.
- Set Location to Head and Condition to Entire Site.
- Click Publish.
Page-Specific Installation
- Edit the page using Elementor.
- Add an HTML widget.
- Paste your chatbot script.
- Save and update the page.
Framer
1
Copy the code snippet
Go to Settings > Web > InstallationEnter the domain where you want to launch your chatbotCopy the “Widget installation code”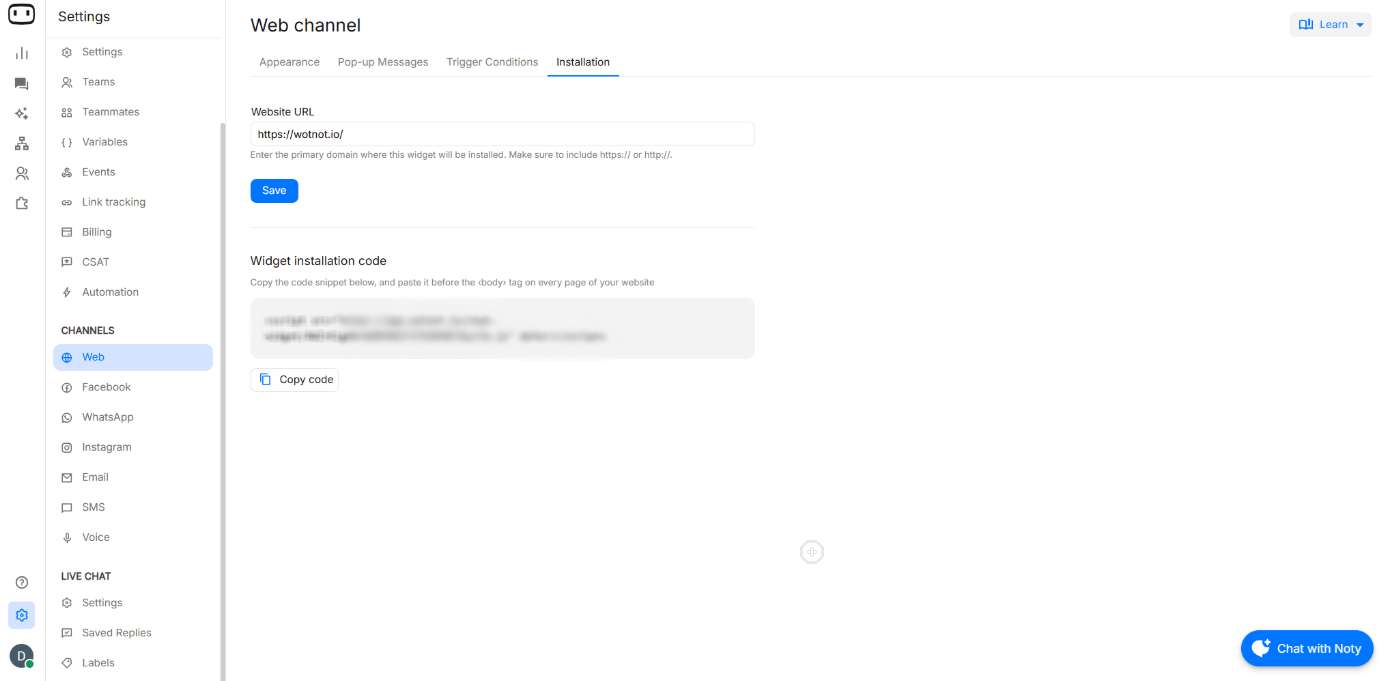
2
Add the code on Framer
Installing on all pages:
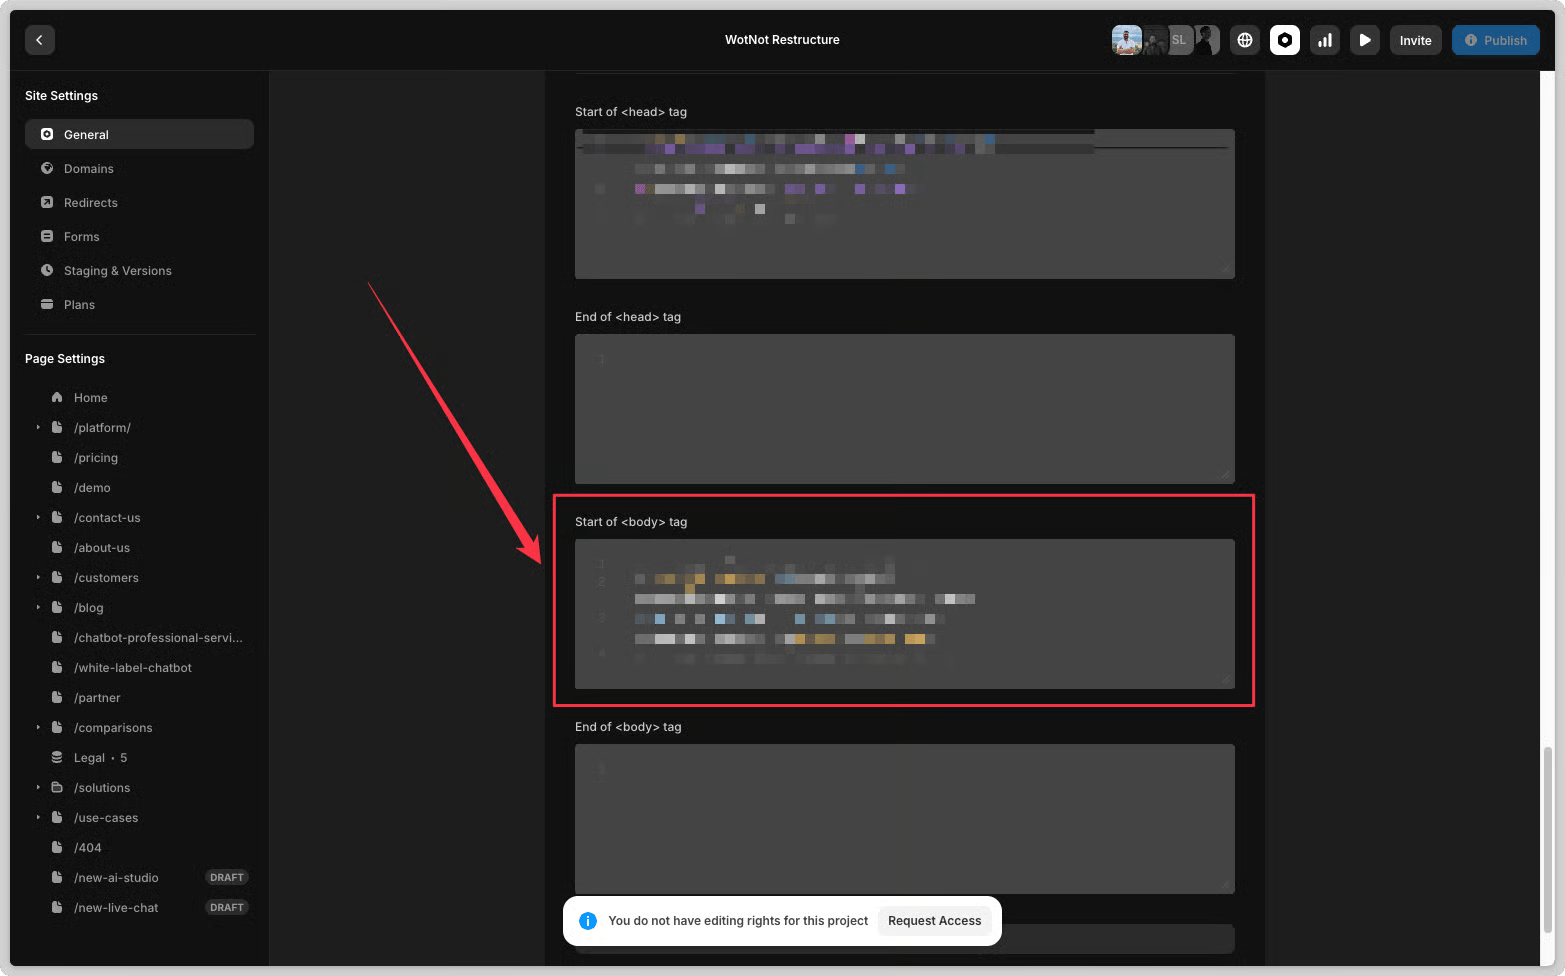
- Open your website project on Framer
- Goto Settings > Site Settings > General
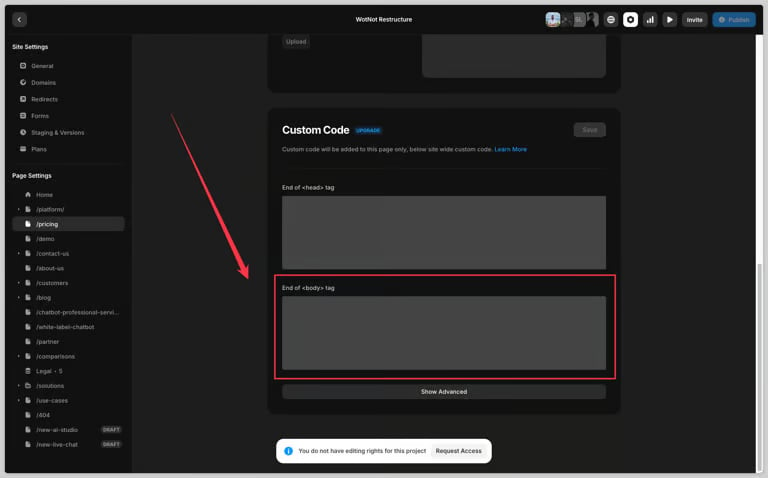
- Scroll down to “Custom code” and paste the code under “Start of <body> tag”.
- Click “Save” to apply the changes
-
“Publish” your site to view the bot on your webpage
- Open your website project on Framer
- Goto Settings > Page settings > select the page
- Scroll down to “Custom code” and paste the code under “Start of <body> tag”.
- Click “Save” to apply the changes
-
“Publish” your site to view the bot on your webpage
Google Tag Manager
1
Copy the code snippet
Go to Settings > Web > InstallationEnter the domain where you want to launch your chatbotCopy the “Widget installation code”
2
Adding the code on Google Tag Manager
- Login to your Tag Manager account
- Click “Add a new tag”
-
Click tag configuration and select “Custom HTML”
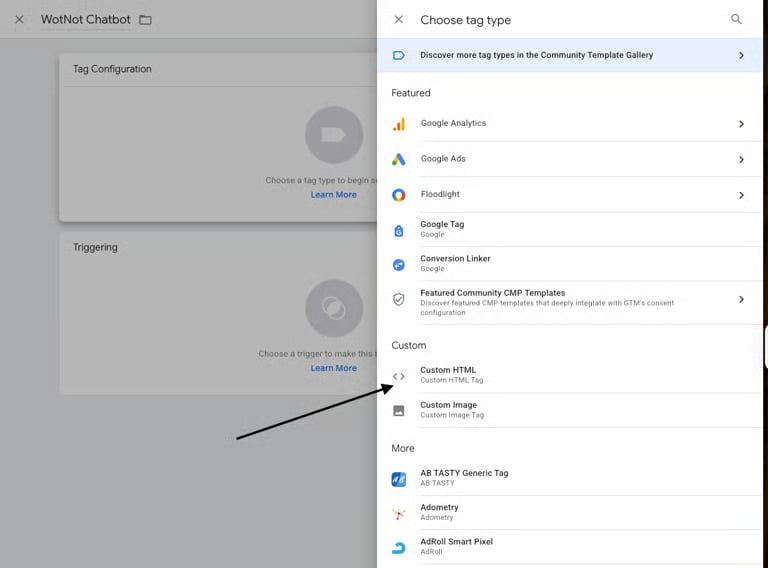
- Paste the widget code here
-
Click trigger and choose “All pages”
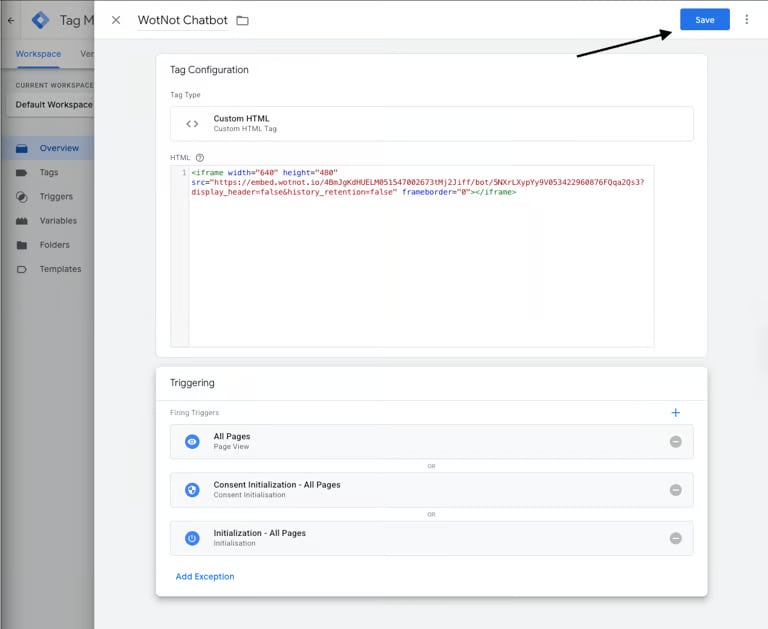
You may create a trigger to only show the chatbot on a few pages.
Squarespace
1
Copy the code snippet
Go to Settings > Web > InstallationEnter the domain where you want to launch your chatbotCopy the “Widget installation code”
2
Adding the code on Squarespace
On the entire website:In-order to embed the chatbot on entire website, you can follow the following steps;
- Go to Settings > Advanced > Code Injection
- Scroll down until you see ‘Footer’ section
- Paste the WotNot code snippet in the ‘Footer’ section
- Go to ‘Channel Configuration -> Web -> Configuration’
- Copy the WotNot ‘Code Snippet’
- Go to desired page where you want to embed the bot
- Hover and select the page setting (menu gear against the page name)
- Under the page settings screen, select ‘Advanced’
- Click on ‘Page Header Code Injection’
- Paste the snippet in the block editor
- Click on ‘Save’ to apply changes
Webflow
1
Copy the code snippet
Go to Settings > Web > InstallationEnter the domain where you want to launch your chatbotCopy the “Widget installation code”
2
Adding the code on Webflow
- Goto website account on Webflow
-
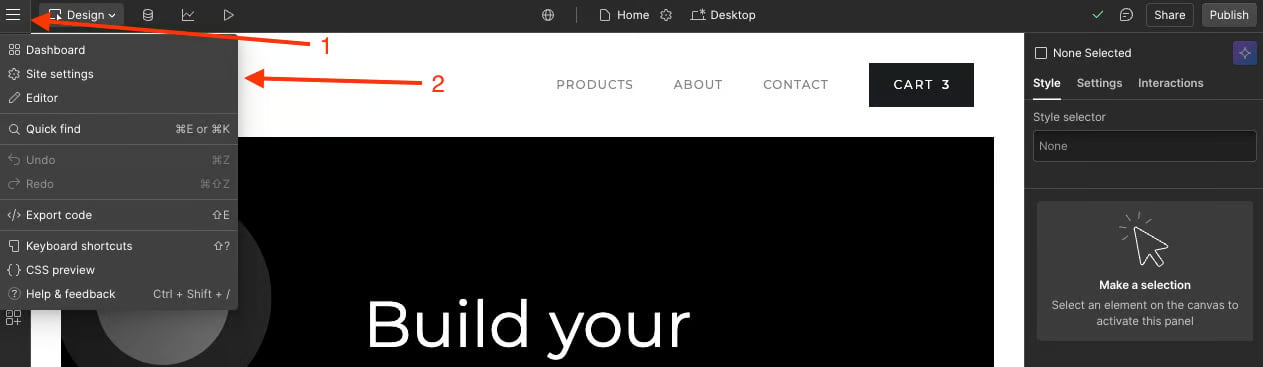
From the menu, select “Site settings”
-
Select “Custom code”
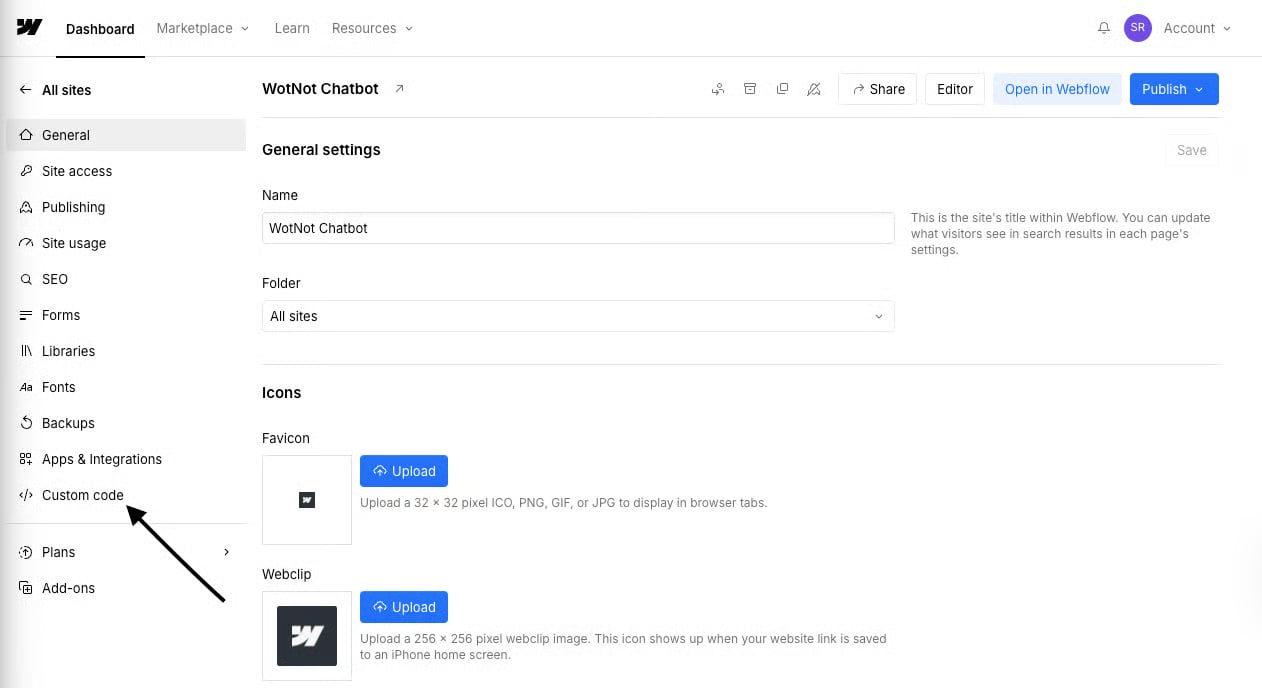
- Paste the WotNot code snippet under the “Head code” section and save changes.
- Publish the changes
Shopify
1
Copy the code snippet
Go to Settings > Web > InstallationEnter the domain where you want to launch your chatbotCopy the “Widget installation code”
2
Adding the code on Shopify
- Login and goto Admin dashboard
- Select “Online Store” > Pages (Choose the pages you want to add)
- Once the page opens, look for a small “< >” source code icon at the top-right of the content editor and click it.
-
Now, paste your WotNot chatbot code
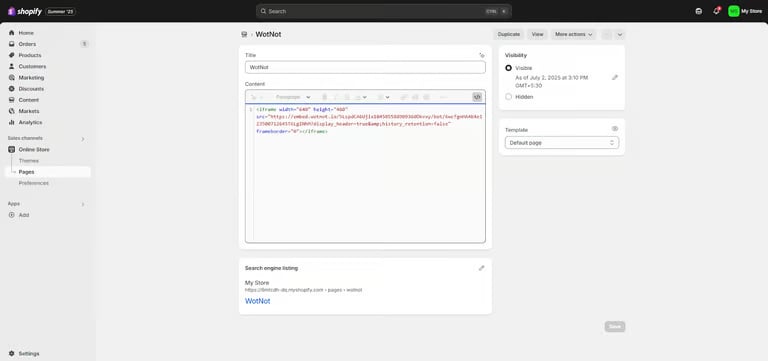
- Click the source code icon again to go back to the normal editor view. You should now see a preview of your chatbot on the page.
- Your chatbot is now added to your Shopify site!
Wix
1
Copy the code snippet
Go to Settings > Web > InstallationEnter the domain where you want to launch your chatbotCopy the “Widget installation code”
2
Adding the code on Wix
-
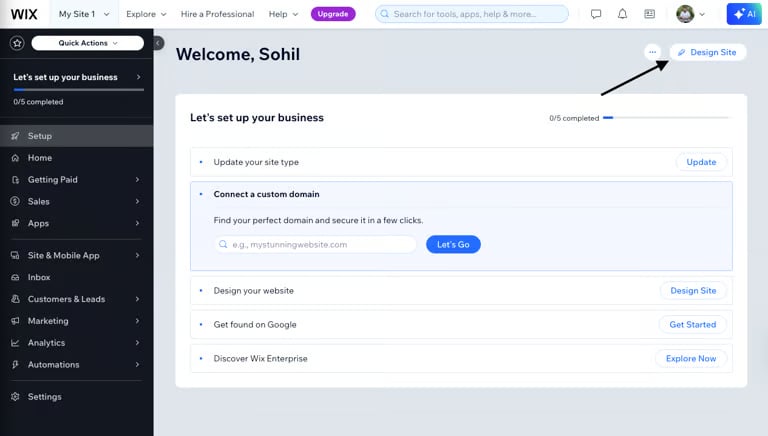
Click on the “Design Site” button in the top-right corner to open the Wix Editor.
- Scroll to the section of your website where you want the chatbot to appear.
-
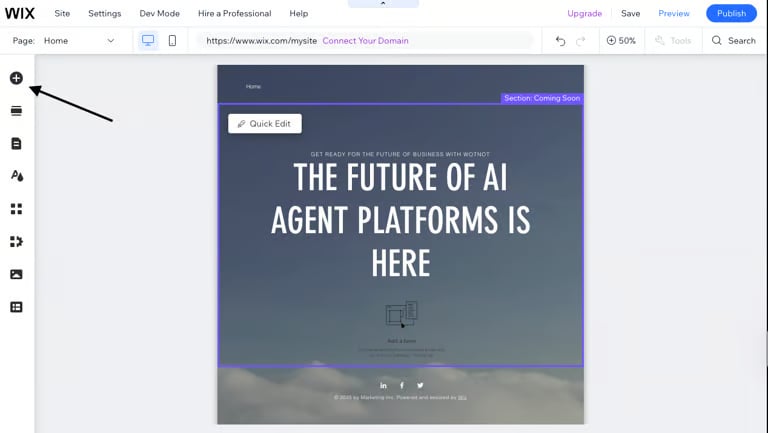
Click the “+” (Add Elements) button on the left sidebar.
-
Scroll down and click on “Embed Code”.
Then select “iTunes Button” and choose “Custom Code”.
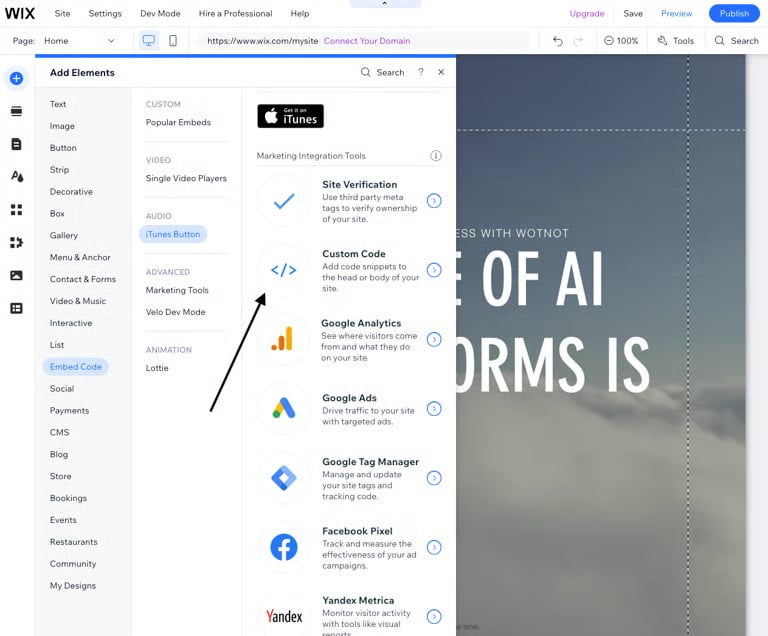
- Click on “+ Add Custom Code” in the top-right corner. Paste your WotNot chatbot embed code into the code editor.
- Under “Add Code to Pages”, choose whether to add the chatbot to all pages or select specific ones. Under “Place Code In”, select where you want the code to be placed (e.g., “Body - end”).
- Click “Apply” to save your changes.
Troubleshooting
Widget not appearing
Widget not appearing
Check these items first:
- Make sure the agent status is Active.
- Confirm that a version of the agent has been deployed.
- Make sure the WotNot snippet is installed correctly.
- Check that the snippet is placed in the correct location for your platform.
- Open the published website rather than only the platform’s editor or preview.
Widget appears on some pages only
Widget appears on some pages only
The snippet is probably not installed on every page where the widget is required.Check your website’s global code settings and confirm that the WotNot snippet is included on every required page.If you intentionally installed the snippet only on selected pages, verify that those pages are included in your platform configuration.
Widget appears but will not open
Widget appears but will not open
Check the following:
- Confirm that the agent is Active.
- Confirm that a version has been deployed.
- Verify that the WotNot snippet is loading correctly on the page.
- Check whether another website script, security policy, or browser extension is preventing the widget from loading.
- Test the website in an incognito/private browser window.
Passed data is not reaching variables
Passed data is not reaching variables
If data passed through query parameters or JSON is not available in the agent:
- Check that the fields are mapped correctly in the Trigger block.
- Verify that the variable names match the values being passed.
- If using URL parameters, confirm that the parameters are present in the page URL.
- If using JSON, confirm that the
data-session-payloadobject is present when the WotNot snippet loads. - Remember that WotNot reads the payload only once, when the snippet fires. Data added later will not be picked up.
Styling conflicts with the host website
Styling conflicts with the host website
If the widget’s appearance is affected by your website’s CSS or you need additional visual customization, review the Custom CSS options available for the web chat widget.
Widget blocked by a consent manager
Widget blocked by a consent manager
If you use a consent-management platform, check whether it is blocking the WotNot script before the visitor provides the required consent.For Google Tag Manager installations, also check your consent mode and tag-firing conditions to make sure the WotNot tag is allowed to run.